How to add products in Product category of ADX Retail Portal

Add Products in Product Category like in Hand Tool as show in below Image.


Before moving forward, click Here to know how to create a product category in product catalog and then follow the below steps

Step 1: Go to Sales Module in CRM. Click on Brand Entity.

Step 2: Create a new Brand. Brand Name depend upon your requirement.

Step 3: Click on the " + " sign of Product grid. Create a New Product under the brand which you have created and fill information in it.
Most important point is:
1) Subject field same as for which Product category you are creating product.
2) After create Product, it is Draft state. you need to publish the product.


Now check the Portal, we have successfully create the product.


But there is no image in this product and price of this product is showing 0.

To add image of product follow the steps:

Step 4: Go to Sales Module in CRM. Click on Sales Literature Entity. Create a new Sales Literature and add following information in it.
Name :  Should be same as the name of product for which you are adding image.
Type : must be "image gallery".
Customer viewable : must be "yes".
Step 5: Click on + sign of Product Grid and add the product in it for which you are adding image.


Step 6: click on "+" sign of SALES ATTACHMENTS and add 6 sales attachment in it like this.


Now check the portal....image is showing in product.

Now the price of product is showing 0.
Click Here to check, How to change the price of product.  

How to add a new Product category in product catalog of ADX Retail Portal.

Add Product Category like Hand Tool, Saw etc. :


Step 1: Open the Dynamic CRM with which the Portal is connected.

Step 2: Go to Setting > Business Management. Now Click On Subject Entity.

Step 3: To create a new Subject, Click on products and then click on Add a subject as show in below image. The name of subject should be same as name of Product category.
Step 4: Go to the Portal section. Click on WEB PAGE entity.

Step 5: Open the Product Web page. Go to the Child Pages Tab of it.
Step 6: To add a new Product category, Click on + sign and then create a new web page and Fill the following Information in it. Name of web page should be the same as name of Product Category.
Step 7: Now Save this web page. To apply the image of this product move to next step.

Step 8: Open the web page which you created in previous step. Click on Image field which is look up of WEB FILE entity. Create a new WEB FILE for this WEB PAGE.
Step 9: Fill the following info for this WEB FILE. Name should be same as name of Product category. Now save this web file.
Step 10: Now Click on Notes section of this web file and attach the Image in it.

Now Go to the Portal and check the Product category. Here I have added some new Product category.


NOTE: Sometime after make changes in CRM, Changes are not reflect in our Portal. To show the Changes in Portal you have to Restart the IIS server.

.
Click on the product category which you have created then you will see there is no product in it.

Click Here to Know, How to add products in Product category.

Here I Hide the some existing Product Category like Hand Tool, Power Tool etc.
Click Here to know, How to Hide Product Category.

How to Hide Product Category in ADX Retail Portal

Step1: Go to Portal > Web Page Entity. Now Open "Product" Web Page.
Step 2: Go to its Child Pages Tab. Here It shows all the Product category which are shows in ADX Retail Portal
Step 3: To Hide any Product Category, Select Web page and then open it. Here i will hide the Hand Tool product category.

Step 4: There is a field having name is Hidden From SiteMap. To hide Product category, set it's value to YES.

Now Go to Portal and then see.... Wow its working......

How to change the Price of Product in ADX Retail Portal

The following steps will help you to change the product's Price.

Step 1: Go to the Product for which you want to change the Product's Price.

Step 2: Enter the price of product in List Price field.
Step 3: Go to the Additional Detail Tab, Click on + sign.
Step 4: Enter the Detail as show in below image. Price list must be Retail Portal Price list(You can create your own Price list but Price list name must be Retail Portal price list). Enter the price in Amount field which is same as you have entered the price in step 2. Save and Close it.
Step 5: Now enter the value in Default Price list field which is Retail Portal Price list.

Now check the Portal.....Its working......


Click Here to know, How to use JS in ADX Studio Portal / D365 Portal.

How to Read Excel Data and Save it in MS Dynamic CRM Entity (Table)

To Achieve this, Firstly you have to Read the Excel Data and then Save it in Fields of Entity.

1) Read Excel data Using Angular js.

Step 1: Download the angular.min.js lib from Here.

Step 2: Create an Html file and Copy paste the following code from Here.

// This is the code to read the Excel data
<html>
 <head>
     // Add lib in the code
<script src="https://cdnjs.cloudflare.com/ajax/libs/jquery/3.2.1/jquery.min.js"></script>
<script type="text/javascript" src="angular.min.js"></script>
<script src="https://cdnjs.cloudflare.com/ajax/libs/xlsx/0.11.5/xlsx.full.min.js"></script>
     <script src="https://cdnjs.cloudflare.com/ajax/libs/xlsx/0.11.5/jszip.js"></script>

     <script type="text/javascript">    
   var app = angular.module('myApp', []);
   app.controller("myCtrl", ["$scope",function($scope){
 
$scope.selectedFile = null;
$scope.msg = "";

$scope.loadFile = function (files) { 
$scope.$apply(function () { 
$scope.selectedFile = files[0]; 
}) 
}

$scope.handleFile = function () {

var file = $scope.selectedFile;
if (file) {
var reader = new FileReader();
reader.onload = function (e) {
var data = e.target.result;
var workbook = XLSX.read(data, { type: 'binary' });
var first_sheet_name = workbook.SheetNames[0];
var dataObjects = XLSX.utils.sheet_to_json(workbook.Sheets[first_sheet_name]);
// Now your Excel data is in dataobjects.
if (dataObjects.length > 0) { 
$scope.save(dataObjects);   // call save function to save the data.
} else {
$scope.msg = "Error : Something Wrong !";
}
}
reader.onerror = function (ex) {
}
reader.readAsBinaryString(file);
}
}

$scope.save = function (data) { 
                  // to save the data in Dynamic CRM, Write code Here.........
                // We can save the data using Web Api 
   alert("this is save function");

  }]);
 
   </script>

<meta></head>

<body style="word-wrap: break-word;">

<div ng-app="myApp" ng-controller="myCtrl">
  <input type="file" name="file" onchange="angular.element(this).scope().loadFile(this.files)">
        <br><br>
            <input type="button" value="Import Data" ng-click="handleFile()">
        <br>
        <p ng-bind="msg"></p>
</div>

</body></html>


Step 3: After save this file, Run this file in Browser and then you will see there is a dataObjects variable which store all Excel Data. After store the data in variable it will call the Save Function to save the Data.

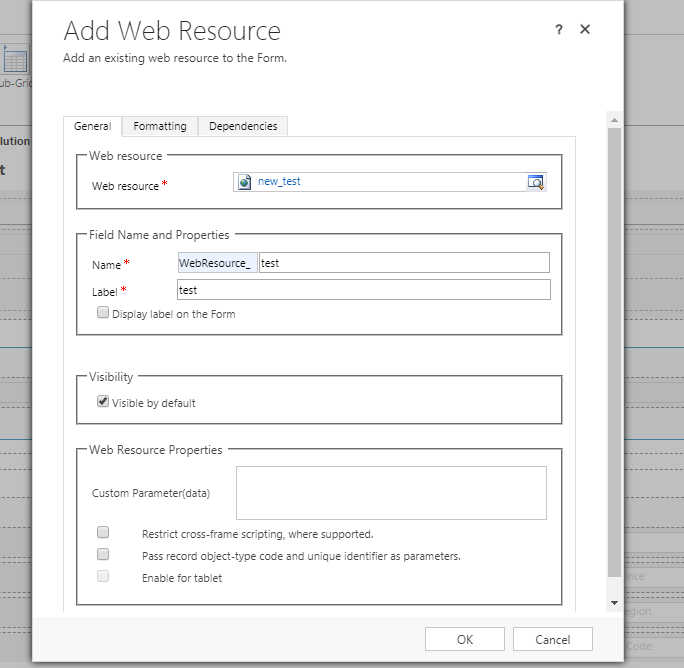
Step 4: Create a new Web Resource in Dynamic CRM. Upload this HTML file in this Web Resource.
Now apply this web Resource on Entity form.

Cool..... Its working....
NOTE:  Apply debugger in Save function and then check Data variable contain all Excel Data.

Important Point: Column Name must be in Single Word like Column_1, Column_2 etc.

How to apply Logo In ADX Retail Portal

Apply Logo in Retail Portal.

There are Two Places where we can apply the logo of company for which we are creating this Portal.

  I would like to apply the logo at 2nd place as show in above image.

Step 1: Hover on it as show in below image and click on Edit.

Step 2: Click on the Icon as show in below image and then click on the BROWSE SERVER.


Step 3: To apply Logo, you have to upload image on this server. Right click on the screen and then click on UPLOAD FILES to upload Logo image on it.

Step 4: After upload images on it, close this window. Now click on this icon to see the code.


NOTE: Change the code as need basis. After Change the code click ok and then save the code. Now reload the Portal to see the changes.


Click Here to know, How to change slider's image in ADX Retail Portal.

Click Here to know, How to add a new product category in product catalog of ADX Retail Portal.

How to change the Slider's Image in ADX Retail Portal

Steps to change slider's Image :

To customize the portal, you have to sign in by a Administrator.

Username : administrator
Password :  pass@word1

Step 1: Hover on the slider, then click on the EDIT as show in Below ScreenShot.

Step 2: Now Click on the Icon as show in Below ScreenShot and then click on the BROWSE SERVER. It will open a new Screen where all slider's Image are placed.


Step 3: To apply the image in slider, Firstly you have to upload image on this server. Right click on the screen which opened in last step and then click on UPLOAD FILES to upload image on it.

Step 4: After upload images on it, close this window. Now click on this icon(show in below Screenshot) to see the code of slider.
NOTE: If you have some good Knowledge of HTML then you can easily change the Slider's Image.

Step 5: Now change the code as need basis. In the SRC attribute, give your image name which you uploaded in step 3. To make other changes in it like Width, Height,Text etc. you can change the code. Click ok and then Save it.

Now Reload the Portal then you will see the changes in it.


Click Here to know, How to apply logo in ADX Retail Portal.

Click Here to know, How to a new Product Category in Product catalog of ADX Retail Portal.

How to use Angular js in MS Dynamic CRM

The Following Steps will help you to use Angular JS in MS Dynamic CRM.


Step 1: Download the angular js lib. from Here.

Step 2: Upload this lib. in CRM as a Web resource like this:
Step 2: Create HTML file and Write the angular js code in it. Here i write very simple code.


Step 3: Create HTML Web Resource in your Dynamic CRM and Upload the file that you have created in the last step, as show in below Image.


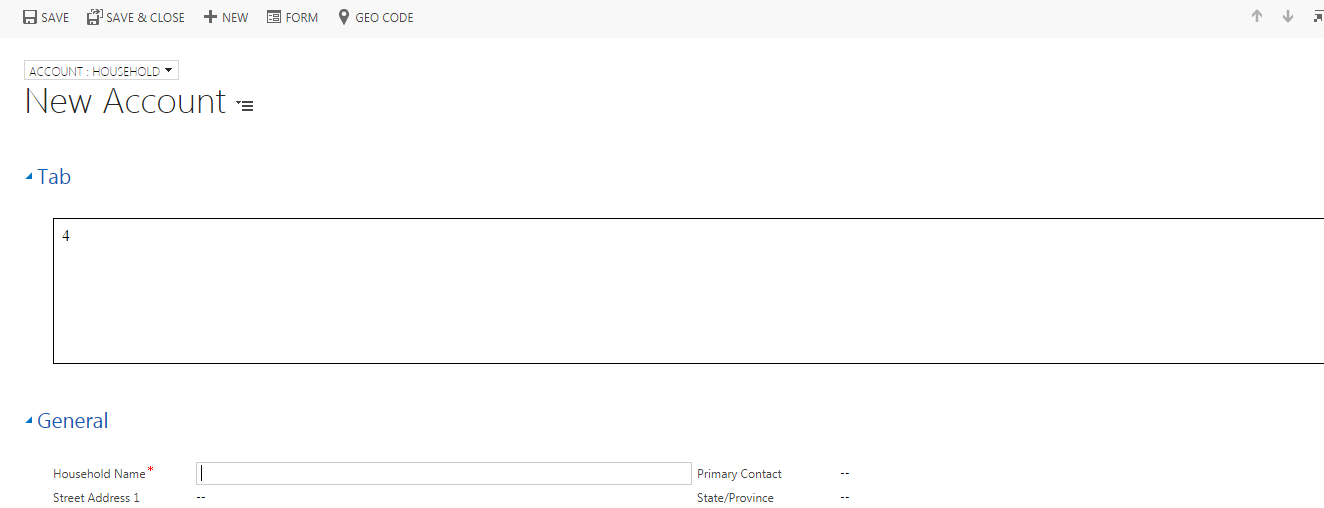
Step 4: Now apply this Web Resource on any Entity form. Here i applied this on Account Entity.

Step 5: Now reload the page and see the page on which web resource is applied.


  Wow... thats work fine...Here i write very simple Angular js code. We can also write complicated code..