How to Update record from entity list in ADX Studio Portal / D365 Portal

Hello guys... Hope you are doing well......In this post i will show you how to update the record from entity list in ADX Studio Portal / D365 Portal.

Step 1: To Update the record, firstly create the Entity form. Go to Portal > Entity Form.

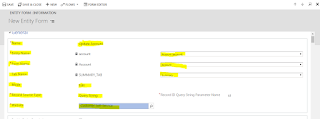
Step 2: Create a new Entity Form record.
Name: Give the Entity form name.
Entity Name: Select the Entity.
Form Name: Select the form.
Tab Name: Select the tab.
Mode: Mode must be Edit.
Record Source type: It must be Query String.
Website: Choose the website for which you are working.

Step 3: Go to Portal  > Entity List in MS Dynamic CRM.

Step 4: Open the Entity List record from where you want to update the record. Here i have entity list whose name is "Account list" (it show the list of Account's record) .

Step 5: Now go to grid configuration section of record. Click on +Edit

Step 6: Now fill the Information.
Target Type: Choose it's value Entity Form.
Entity Form: Choose the Entity form which you created in Step-2.
Button Label: Give Button Label.

Step 7: Now check the Enable Entity Permissions. If it is not check then click on the checkbox because without enable it, you are not able to Update record by this way.

Step 8: Now go to Portal > Entity Permission.

Step 9: Create a new Entity Permission. If you have already created entity permission for this entity then open this Entity permission otherwise create a new one. Here i have already created entity permission in my last post to delete the record. I will use this one.

Step 10: Give the Proper Privileges. To Update the record, Give Write and Read Privileges and then save the record.

Step 11: After save the record. Scroll down the record and check the web role. if there is no web role for this record then add the Authenticate User web role.

Refresh your Portal and check......


Click Here to know, How to remove Comment Section from Web Page in ADX Retail Portal.

Click Here to know, How to Hide "AzureAD" button and "Sign in with External Account" in D365 Portal.

Click Here to know, How to make a ADX Studio Portal / D365 Portal Multi-Lingual.

How to Delete the Record from Entity list view in ADX Studio Portal / D365 Portal.

If you want to Delete the record from Entity list view in ADX Studio Portal / D365 Portal then follow the steps:

Step 1: Go to Portal > Entity List in MS Dynamic CRM. Open the Entity list record from where you want to delete the record. Here i have entity list whose name is "Account List"(it show the list of Account's records) 

Step 2: Go to Grid Configuration. Click on +Delete.
Step 3: Give Button label.

Step 4: Now Enable Entity Permissions. Without enable it you are not able to Delete the record.

Step 5: Go to Portal > Entity Permission.

Step 6: Create a new Entity Permission.
Name: Give the name what you like.
Entity Name: Select the entity for which you want to delete the record.
Website: Select the website.
Scope: Select the scope. Here I select the Global scope. 
Give the Privileges.

Step 7: After save the entity permission record, scroll down the record and Add Web roles. Here i added Authenticate User web role.


Now refresh the portal and check.....Now you can delete the record from portal.


Click Here to know, How to Update the record from Entity List view in ADX Studio Portal / D365 Portal.

How to get the list of all records from MS Dynamic CRM and view it in ADX Studio Portal / D365 Portal (Create Entity List)

In this post, I will show you how to get list of all account's records from MS Dynamic CRM and View it in ADX Studio Portal / D365 Portal.

Step 1: Go to Portal > Web Page. Create a new Web page.

Step 2: Go to Portal > Entity List. Create a new Entity list.
Entity Name: Select the entity for which you want to show list of record.
Website: Select the website.
View: To add view. Click on +View and select the view. You can also add multiple views.

Step 3: Now Open the web page which you created in Step-1. Set the Entity list which you created in step-2.
Step 4: Open your ADX/D365 Portal and click on edit as show in below image. Add a link of web page which you created in Step-1. I added the link in header.


Open portal and check......

Note: Sometime List not visible. To check this issue...
 # Click on edit web page and check Entity List is set or not. If not then set its value(which you created in Step-3).


Click Here to know, How to Delete the Record from Entity List view in ADX Stuido Portal / D365 Portal.

Click Here to know, How to Update the Record from Entity LIst view in ADX Studio Portal /  D365 Portal.

How to create record or Entity form in ADX Studio Portal / D365 Portal (Create Entity Form)

In this post, i will show you how to create a Account's form which is use to create account's records in MS Dynamic CRM. You can create your own entity form depending upon your requirement.

Step 1: Go to Portal > Web page. Create a new web page as show in below image.

Step 2: Go to Portal > Entity Form.

Step 3: Create a New Entity form.
Name : Give the name of Entity form as you like.
Entity Name : Select the Entity for which you are creating form.
Form Name: Select the form.
Tab Name: It is optional. If you want to show any specific tab then select the tab else it show whole form on portal.
Mode : It must be Insert.
Website: Select website for which you are creating form.

Step 4: Open the Web page which you created in Step-1. Set the entity form value which you created in Step-3.

Step 5: Open your ADX/D365 portal and click on edit as show in below image. Add a link of web page which you created in Step-1. I added the link in header.


Open Portal and check.....


Note: Sometime form not visible. To check this issue...
 # Click on edit web page and check Entity form is set or not. If not then set its value(which you created in Step-3).


 To change the name of submit button :

Step 1: Open the Entity form which you created in step-3 and go to the Additional Setting Tab. Click on +submit


Step 2: Give the button label as you want 
.

Check Portal........


Click Here to know, How to get list of all Records which you created here and view it in ADX Retail portal / D365 Portal.   

How to disable open registration process in D365 Portal.

To disable open registration process, you need to hide registration page like this
Now follow the steps to disable open registration process.

Step 1: Go to Portal > Site settings.

Step 2: Open the record whose name is Authentication/Registration/OpenRegistrationEnabled.

Step 3: Set its value to false and save the record.

Go to portal and then check..... registration page has been hide. Now question raised How to create user account for portal after disable Open registration process. 

Now follow the steps to Create user account for portal after disable open registration process.

Step 5: Firstly you have to create contact in MS Dynamic CRM for Portal's User's Account.  

Step 6: After Create contact, Click on Create Invitation button.

Step 7: After click on button, it will open a new Invitation form. Now Save this form after fill infomation.

Step 8: Now Scroll down the Invitation record which you created in step-7. Go to Advance tab
and check Invitation code.

Step 9: Now you can send this Invitation code through an Email. We have a By-default Workflow whose name is Send-Invitation. This workflow send Invitation code to User's Email. You can also Modify this workflow as per your need.

Step 10: After got an Invitation code through an E-mail. Copy-Paste the code in portal's Redeem Invitation and then click on register.
Step 11: After click on register, it will open a registration page. Here you can set your username and password for portal's account.
Note: It will update the contact which you created in Step 5.

Note: You can also create workflow to create invitation code. Now the process become
* Create Contact in Dynamic CRM.
* After create contact, a workflow will run which create an Invitation record which contain invitation code.
* After create invitation record, again workflow (Send-Invitation) will run which send Invitation code through an E-mail. 


Click Here to know, How to Create Entity Form in ADX Studio Portal / D365 Portal.

Click Here to know, How to Hide Sign in with External account label and AzureAD in D365 Portal.