Configure Sub-Grid in Entity form in ADX Studio Portal / D365 Portal.

In D365 Portal / ADX Studio Portal, If you have a requirement to apply Sub-Grid on entity form and perform some action on Sub-Grid then follow the steps to do this.
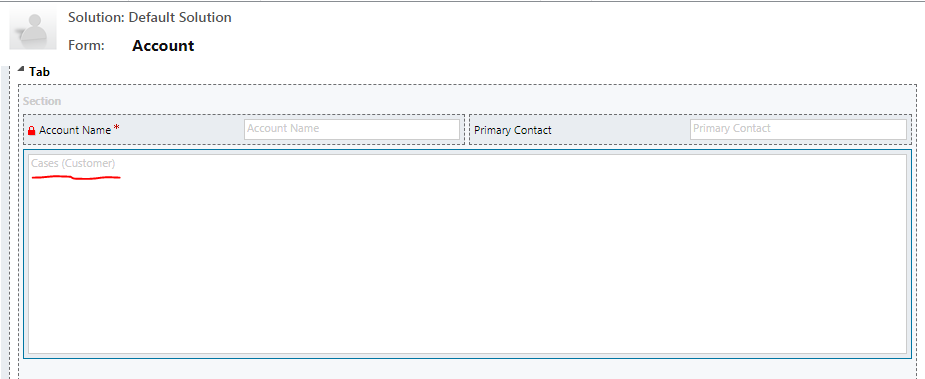
Here i will show you.....How to apply the sub-grid of CASE Entity on account form and perform some action on CASE Sub-Grid.

Here I am supposing you have the list of accounts in portal as show in below Screen-Shot.


If you don't know how to do this then click Here to know.

Step 1: Go to Account Entity in CRM and Open the "Portal Account" form. Now add the Sub-Grid of CASE entity.

Step 2: Go to Portal > Entity Form. Create a new Entity form to update the account record.


Step 3 : Now Scroll Down this record and Create a new Entity Form Meta Data.

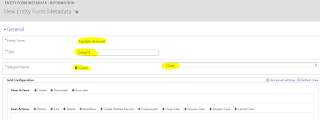
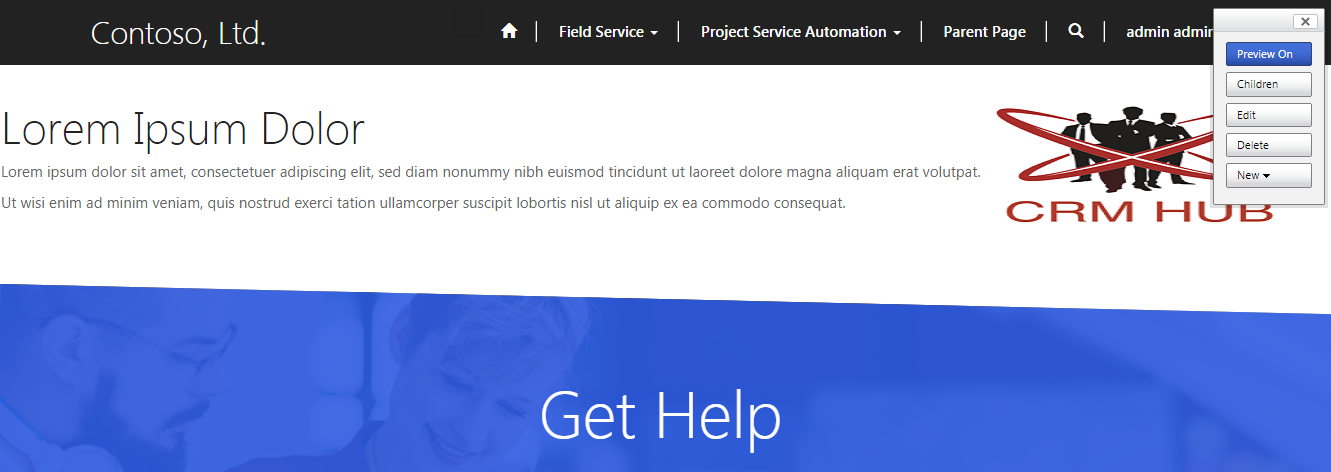
Step 4: Now Add the action in grid which you want to perform.
Step 4: Go to Portal > Web Page. Create a new Web page for the entity form which you created in step-2.


Step 5: Go to Portal > Entity List. Open the Entity List record which shows the account list in portal.


Step 6: Now Scroll-down this record and select the web page which you created in Step-4.

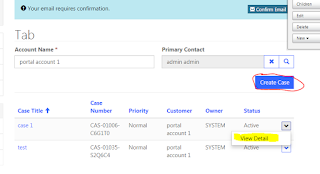
Step 7: Now go to portal and check... you can now perform the actions in Sub-Grid.


Click Here to know, Apply Client Side validation in D365 Portal / ADX Studio Portal.

Create new Web Roles and open web pages depend upon your web roles in ADX Studio Portal / D365 Portal.

Hello guys..... If you have a requirement like web pages will open based on the user's role, For example: In your portal there are two kind of users one is VIP user and another one is Guest user. When VIP user login the portal, they will see only VIP page and when Guest user login the portal, they will see only Guest page.
To complete this kind of requirement, firstly you have to create a new web roles and give permission on these web roles. Now follow the steps to do it:

I have already created two web pages one is VIP web page and another one is Guest web page.


Step 1:  Go to Portal > Web Role.

Step 2: Create new web roles. Here i am creating two web roles, one is VIP role and other one is Guest Role.
Name: Give the web role name.
Website: Select the website for which we are working.


Step 3: Go to Portal > Web Page Access Control Rule.

Step 4: Create new rule for each web page. Here I am creating two rules, one is for VIP and another one is for Guest.
Name: Give some good name of the rule.
Website: Select the website for which you are working.
Web Page: Now select the web page on which you want to apply rule.
Right: Give the right. Here i am giving Restrict Read.
Scope: Here i am selecting All Content.


Step 5: Scroll down the rule and add web role in each rule as show in below snapshot.


Step 6: Now go to each contact and give web role based on the user. Here i have two contact one is VIP and another one is Guest. I am giving VIP rule to VIP user and Guest rule to Guest user.


Now Go to Portal and check VIP user can access only VIP page and Guest user can access only Guest page.


Click Here to know, Configure Sub-Grid in Entity form in ADX Studio Portal /  D365 Portal.

Control Access Rule of Web Page in ADX Studio Portal / D365 Portal.

Hello Guys....When you create your own custom web pages in the portal, you see that page will be access by users without log-in the portal.In my last post, I created my own web page but you can see this page is accessible without login the portal. If you have not checked this post yet then click Here.

With the help of "Web Page Access Control Rules", we can avoid this kind of situations. Follows the steps to know :

Step 1: Go to Portal > Web Page Access Control Rule.

Step 2: Create a new Rule.
Name: Give some good name of the rule.
Website: Select the website for which you are working.
Web Page: Now select the web page on which you want to apply rule.
Right: Give the right. Here i am giving Restrict Read.
Scope: Here i am selecting All Content.

Step 3: Scroll down this rule and Add web role in the web role section.

Now check the Portal.... Without log-in,user is not able to access this page.


Click Here to know, Create new Web Roles and open web pages depend upon your web roles in ADX Studio Portal / D365 Portal.

Inheritance of web pages using Liquid Template in ADX Studio Portal / D365 Portal

Hello Guys.....We all know that Inheritance is a mechanism in which child object acquires all the property of his parent object. We can also use inheritance in this portal in which one web page inherit the another web page. This can be done through Liquid Template.

Firstly, I will create a parent web page and then show you how to inherit this parent page into child page

Step 1: Go to Portal > Web Template.

Step 2: Create a new Web Template. Give some Name and select the website for which you are working this. This web template is the parent page. All the child pages will inherit this parent page.

Step 3: Now go to Portal > Page Template.

Step 4: Create a new Page Template.
Name: Give some name as you like.
Website: select the website for which you are working.
Type: type is to be web template.
Web Template: select the web template which you created in step-2.
Use website Header and Footer: Checked this option.
Entity Name: select the web page entity.


Step 5: Now go to Portal > Web Page.

Step 6: Create a new web page.
Name: Give some name as you like.
Website: Select the website for which you are working.
Parent page: Parent page will be the Home.
Partial URL: Give the URL as you like.
Page Template: Select the page template which you create in step-4.
Publishing state: It must be Published.

Step 7: Now add this web page in Header's Nav Bar.


Open this web page in Portal. This web page is your parent page.


Now you want to inherit this page in another web page. 

Step 8: Now go to Portal > Web Template. Create a new web template which will inherit the parent web template.
Copy the below code and paste it in your code. This code is use to inherit the page
{% include 'Name of parent web template' %}

Step 9: Now go to Portal > Page Template and create a new page template for it.

Step 10: Now go to Portal > Web Page and create a new web page for this page template.

Step 11: Now add this child page in header's Nav Bar.


Open this child page in portal....


Click Here to know, Control Access Rule of Web Page in ADX Studio Portal / D365 Portal.