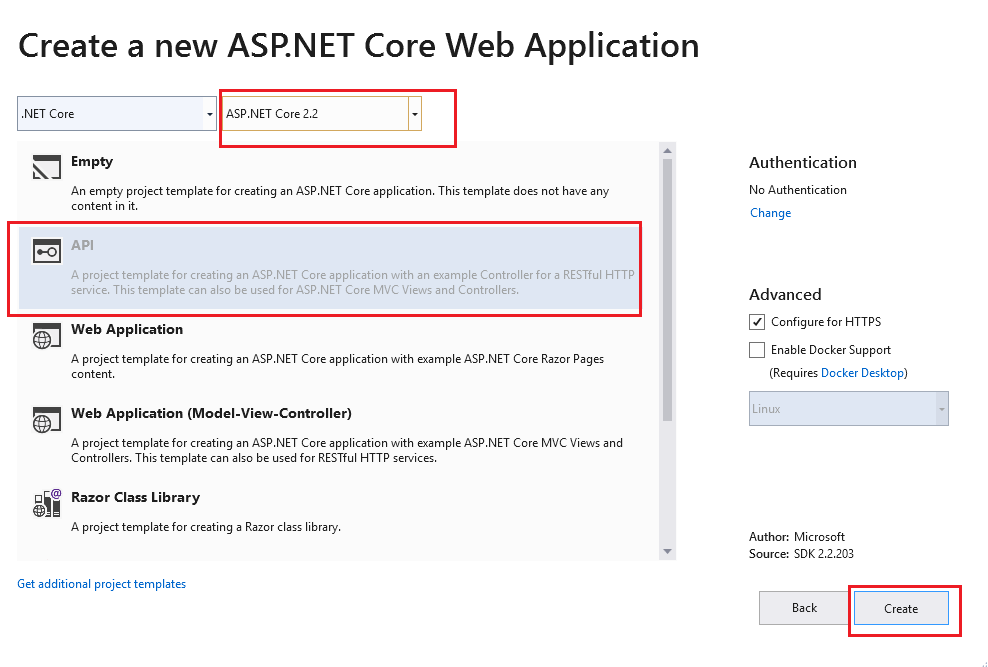
In this article, I will explain you how to setup OData API in .Net Core but before moving forward if you haven't read my article on Entity Framework Code First Approach in .Net Core then firstly read the article.
OData is an Open Data Protocol which gives the flexibility to your API's through the OData URL Conventions.
In our Part-2, We created the API project and used Entity Framework (Code First Approach). Now we need a mechanism to access the context from our API. Directly accessing the context methods from the API controller is a bad practice and we should avoid that. We will inject interface into our API Controller and API will communicate with the data context using the interface.
Now follow the steps to do this.
Step 1: Install OData Nuget package.
Go to NuGet package manager and install "Microsoft.AspNetCore.OData" package.


Step 2: Create a new folder under the Models folder and name it Repository and Create a new Interface under the repository folder and called it IStudentRepository.

Step 3: Now create a new folder under the Models folder, called it DataManager and then create a new class under this folder named it StudentManager. This class will implement IStudentRepository interface.


GetAll(): Used to gets all the students from DB.
Get(): used to Get a specific student by passing GUID of student
Add(): used to create a new student in DB.
Delete(): used o delete the student from DB.
Update(): used to update student information.
Here we not directly accessing the context file in controller. Now this class(student class) which access the context file will perform all the CRUD operations instead of API controller.
Step 4: Go to Startup.cs file. Here we will configure the repository using dependency injection. This can be done in the ConfigureServices method in the Startup.cs.

Step 5: Create an API controller for Student.
Go to controller folder and create an API controller in it.


Step 6: Buid the EDM Model.
OData uses the Entity Data Model (EDM) to describe the structure of data. To build the EDM Model, add a static method in startup.cs file.
In this EDM Model, we defined one entity set which is student. you can define more sets according to your requirement.

private static IEdmModel GetEdmModel()
{
ODataConventionModelBuilder builder = new ODataConventionModelBuilder();
builder.EntitySet<Student>("Student");
return builder.GetEdmModel();
}
Step 7: Register the OData Services.
The library provides an extension method called “AddOData()” to register the required OData services through the built-in dependency injection. Now add the following codes into “ConfigureServices” method in the “Startup” class:

and now we also need to change MVC() function service registration.
The EnableEndpointRouting option determines, routing should internally use endpoint-based logic. it's default value is true. Set the value to false. change the code as show in below snapshot.

services.AddMvc(options =>
{
options.EnableEndpointRouting = false;
}).SetCompatibilityVersion(CompatibilityVersion.Version_2_2);
Step 8: Register the OData Endpoint
Now We also need to add OData route to register the OData endpoint. We are going to add an OData route named “odata” with “odata” prefix to the MVC routes, and call the “GetEdmModel()” to bind the Edm model to the endpoint. Now add the following code into Configure method in stratup.cs file
Now let's do the testing.
Now Hit the URL : https://localhost:44376/odata/student
If there is data then all the data will come but if there is no data it will come like this.

Hope this will help you !!!
OData is an Open Data Protocol which gives the flexibility to your API's through the OData URL Conventions.
In our Part-2, We created the API project and used Entity Framework (Code First Approach). Now we need a mechanism to access the context from our API. Directly accessing the context methods from the API controller is a bad practice and we should avoid that. We will inject interface into our API Controller and API will communicate with the data context using the interface.
Now follow the steps to do this.
Step 1: Install OData Nuget package.
Go to NuGet package manager and install "Microsoft.AspNetCore.OData" package.


Step 2: Create a new folder under the Models folder and name it Repository and Create a new Interface under the repository folder and called it IStudentRepository.

using Microsoft.AspNet.OData;
using System;
using System.Linq;
namespace NET_Core_API.Models.Repository
{
public interface IStudentRepository<TEntity> where TEntity : class
{
IQueryable GetAll();
TEntity Get(Guid id);
TEntity Add(TEntity entity);
void Update(TEntity entityToUpdate, Delta<TEntity> entity);
void Delete(TEntity entity);
}
}
using System;
using System.Linq;
namespace NET_Core_API.Models.Repository
{
public interface IStudentRepository<TEntity>
Step 3: Now create a new folder under the Models folder, called it DataManager and then create a new class under this folder named it StudentManager. This class will implement IStudentRepository interface.


using Microsoft.AspNet.OData;
using NET_Core_API.Models.Repository;
using System;
using System.Linq;
namespace NET_Core_API.Models.DataManager
{
public class StudentManager : IStudentRepository<Student>
{
readonly EntityContext _Context;
public StudentManager(EntityContext context)
{
_Context = context;
}
public IQueryable GetAll()
{
return _Context.Students;
}
public Student Get(Guid id)
{
return _Context.Students.FirstOrDefault(e => e.ID == id);
}
public Student Add(Student entity)
{
_Context.Students.Add(entity);
_Context.SaveChanges();
return entity;
}
{
newStudent.Patch(studentToUpdate);
_Context.SaveChanges();
}
public void Delete(Student student)
{
_Context.Students.Remove(student);
_Context.SaveChanges();
}
}
}
using NET_Core_API.Models.Repository;
using System;
using System.Linq;
namespace NET_Core_API.Models.DataManager
{
public class StudentManager : IStudentRepository<Student>
{
newStudent.Patch(studentToUpdate);
_Context.SaveChanges();
}
GetAll(): Used to gets all the students from DB.
Get(): used to Get a specific student by passing GUID of student
Add(): used to create a new student in DB.
Delete(): used o delete the student from DB.
Update(): used to update student information.
Here we not directly accessing the context file in controller. Now this class(student class) which access the context file will perform all the CRUD operations instead of API controller.
Step 4: Go to Startup.cs file. Here we will configure the repository using dependency injection. This can be done in the ConfigureServices method in the Startup.cs.

services.AddScoped<IStudentRepository<Student>, StudentManager>();
Step 5: Create an API controller for Student.
Go to controller folder and create an API controller in it.


using System;
using System.Linq;
using Microsoft.AspNet.OData;
using Microsoft.AspNetCore.Mvc;
using NET_Core_API.Models;
using NET_Core_API.Models.Repository;
namespace NET_Core_API.Controllers
{
public class StudentController : ODataController
{
private readonly IStudentRepository<Student> _dataRepository;
public StudentController(IStudentRepository<Student> dataRepository)
{
_dataRepository = dataRepository;
}
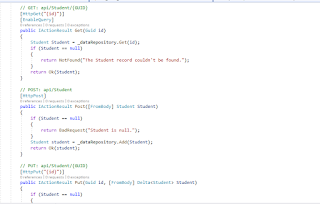
// GET: api/Student
[HttpGet]
[EnableQuery]
public IActionResult Get()
{
IQueryable Students = _dataRepository.GetAll();
return Ok(Students);
}
// GET: api/Student/{GUID}
[HttpGet("{id}")]
[EnableQuery]
public IActionResult Get(Guid id)
{
Student Student = _dataRepository.Get(id);
if (Student == null)
{
return NotFound("The Student record couldn't be found.");
}
return Ok(Student);
}
// POST: api/Student
[HttpPost]
public IActionResult Post([FromBody] Student Student)
{
if (Student == null)
{
return BadRequest("Student is null.");
}
Student student = _dataRepository.Add(Student);
return Ok(student);
}
// PUT: api/Student/{GUID}
[HttpPut("{id}")]
{
if (Student == null)
{
return BadRequest("Student is null.");
}
Student StudentToUpdate = _dataRepository.Get(id);
if (StudentToUpdate == null)
{
return NotFound("The Student record couldn't be found.");
}
_dataRepository.Update(StudentToUpdate, Student);
return NoContent();
}
// DELETE: api/Student/{GUID}
[HttpDelete("{id}")]
public IActionResult Delete(Guid id)
{
Student Student = _dataRepository.Get(id);
if (Student == null)
{
return NotFound("The Student record couldn't be found.");
}
_dataRepository.Delete(Student);
return NoContent();
}
}
}
using System.Linq;
using Microsoft.AspNet.OData;
using Microsoft.AspNetCore.Mvc;
using NET_Core_API.Models;
using NET_Core_API.Models.Repository;
namespace NET_Core_API.Controllers
{
public class StudentController : ODataController
{
private readonly IStudentRepository<Student>
{
if (Student == null)
{
return BadRequest("Student is null.");
}
Student StudentToUpdate = _dataRepository.Get(id);
if (StudentToUpdate == null)
{
return NotFound("The Student record couldn't be found.");
}
_dataRepository.Update(StudentToUpdate, Student);
return NoContent();
}
Step 6: Buid the EDM Model.
OData uses the Entity Data Model (EDM) to describe the structure of data. To build the EDM Model, add a static method in startup.cs file.
In this EDM Model, we defined one entity set which is student. you can define more sets according to your requirement.

builder.EntitySet<Student>("Student");
return builder.GetEdmModel();
Step 7: Register the OData Services.
The library provides an extension method called “AddOData()” to register the required OData services through the built-in dependency injection. Now add the following codes into “ConfigureServices” method in the “Startup” class:

services.AddOData();
and now we also need to change MVC() function service registration.
The EnableEndpointRouting option determines, routing should internally use endpoint-based logic. it's default value is true. Set the value to false. change the code as show in below snapshot.

{
options.EnableEndpointRouting = false;
}).SetCompatibilityVersion(CompatibilityVersion.Version_2_2);
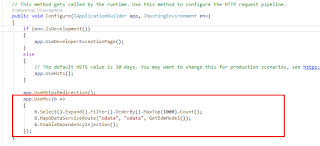
Step 8: Register the OData Endpoint
Now We also need to add OData route to register the OData endpoint. We are going to add an OData route named “odata” with “odata” prefix to the MVC routes, and call the “GetEdmModel()” to bind the Edm model to the endpoint. Now add the following code into Configure method in stratup.cs file

app.UseMvc(b =>
{
b.Select().Expand().Filter().OrderBy().MaxTop(1000).Count();
b.MapODataServiceRoute("odata", "odata", GetEdmModel());
b.EnableDependencyInjection();
});
{
b.Select().Expand().Filter().OrderBy().MaxTop(1000).Count();
b.MapODataServiceRoute("odata", "odata", GetEdmModel());
b.EnableDependencyInjection();
});
Now let's do the testing.
Now Hit the URL : https://localhost:44376/odata/student
If there is data then all the data will come but if there is no data it will come like this.
Hope this will help you !!!