Hello guys.... this is the 2nd post on custom web page in portal. If you don't know the 1st post on this then click Here to know "How to create a custom web page" otherwise follow the steps to know how to add entity form in custom web page.
Step 1: Go to Portal > Entity Form and then create a new entity form.


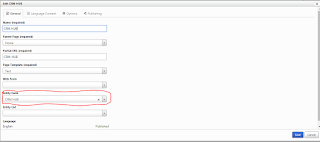
Step 2: Go to Portal > Web page. Open a web page on which you want to apply this entity form. Now select the entity form which you created in last step.

Step 3: Now go to Portal > Web Template. Open a web template which is applied on the web page.
Step 4: Copy the below code and paste it in source panel of web template.
{% entityform id:page.adx_entityform.id %} or you can use this one also
{% entityform name:'Entity form name' %}

Now check the Portal....

If form is not visible to you then click on edit web page and check entity form is selected or not. If not then select it.

Click Here to know, Content Snippet in ADX Studio Portal / D365 Portal.
Step 1: Go to Portal > Entity Form and then create a new entity form.


Step 2: Go to Portal > Web page. Open a web page on which you want to apply this entity form. Now select the entity form which you created in last step.

Step 3: Now go to Portal > Web Template. Open a web template which is applied on the web page.
Step 4: Copy the below code and paste it in source panel of web template.
{% entityform id:page.adx_entityform.id %} or you can use this one also
{% entityform name:'Entity form name' %}

Now check the Portal....

If form is not visible to you then click on edit web page and check entity form is selected or not. If not then select it.


Click Here to know, Content Snippet in ADX Studio Portal / D365 Portal.
3 comments:
useful blog post!!!
Dealer Clusters in Gurugram
Market Index in Mumbai
Sales Opportunities in Mumbai
Category sales in Mumbai
Great blog post! Adding an entity form using Liquid Template in D365 Portal is incredibly helpful. "Flowgiri webflow templates" could further enhance the customization process. Thanks for sharing!
flowgiri
"Your blog post is a treasure trove for anyone grappling with adding an entity form using Liquid Template in D365 Portal. The clarity of your instructions is a lifesaver! To amplify the customization journey, consider exploring 'Flowgiri webflow templates'—they're like the secret sauce that can elevate your portal aesthetics and functionality. Kudos for sharing such valuable insights!"
Post a Comment