This is the Part-2 of our article. If you haven't read part-1 yet then click Here to go.
Step 1: Create a .NET Core project.
Firstly open the visual studio and create a project in .NET Core. Here i am using VS19.

In the next window, Give the Name of your project. and then click on create button.

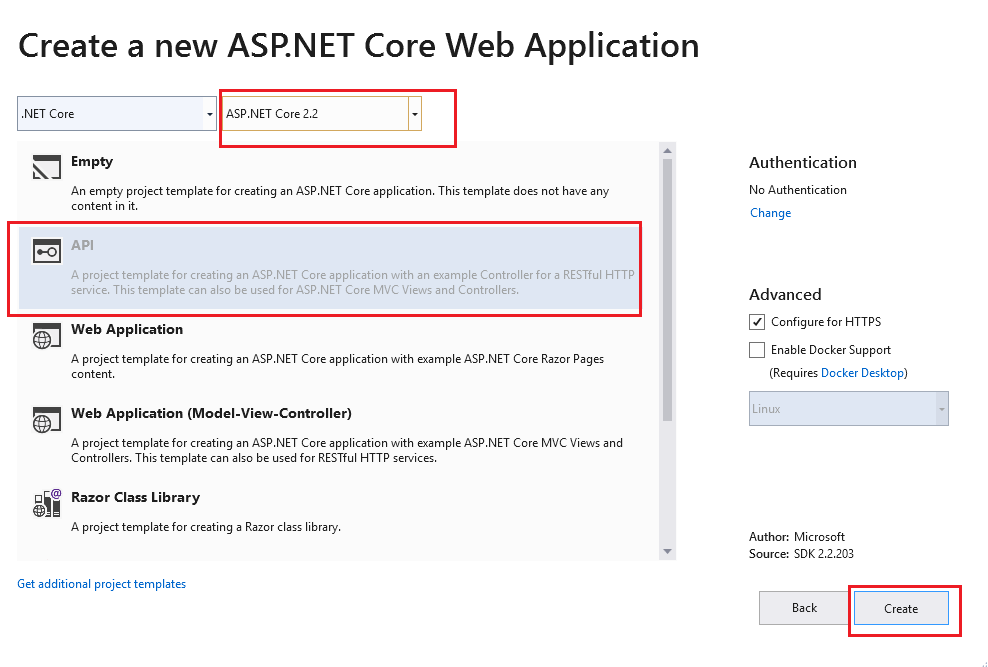
In the another next window, choose the type of project. Here i am selecting API. Also, from the drop-down choose ASP.NET Core 2.2. After all that, just click the Create button and then project will load.

Step 2: Add Connection String.
Go to appsettings.json file. and Add Database connection in this file as show in below.
modify the Connection String Property as per your need.
 Step 3: Defining the Models.
Create a new folder Models within the root of the application. and add a new class Student.cs inside the Models folder.
 Copy the below code and modify as per your need.

Step 4: Define Context File.
Now create CS EntityContext file in the project.
Copy the below code and paste it in context file. Change the code as per your need.

Step 5: Register the context file.
Now go to Startup.cs file and register our context in the Startup.cs file.
Copy the below code and paste it in ConfigureServices function.

Step 5: Install EFCore.SQL.
Go to NuGet package manager and install Microsoft.EntityFrameworkCore.SqlServer package.


Step 6: Create DataBase
Go to NuGet console and run the command


Now let’s apply these changes to the database.
Run the following command

This will update the database based on our models.
Now go to database and check, it will create the DB.

In this article, I will explain you how to use Entity FrameWork with Code First Approach in our .NET Core project.
Step 1: Create a .NET Core project.
Firstly open the visual studio and create a project in .NET Core. Here i am using VS19.

In the next window, Give the Name of your project. and then click on create button.

In the another next window, choose the type of project. Here i am selecting API. Also, from the drop-down choose ASP.NET Core 2.2. After all that, just click the Create button and then project will load.
Step 2: Add Connection String.
Go to appsettings.json file. and Add Database connection in this file as show in below.
modify the Connection String Property as per your need.
{
"Logging": {
"LogLevel": {
"Default": "Warning"
}
},
"ConnectionString": {
"DB": "server=.;database=StudentDB;User ID=USER_NAME;password=PASSWORD;" },
"AllowedHosts": "*"
}
"Logging": {
"LogLevel": {
"Default": "Warning"
}
},
"ConnectionString": {
"DB": "server=.;database=StudentDB;User ID=USER_NAME;password=PASSWORD;" },
"AllowedHosts": "*"
}

Create a new folder Models within the root of the application. and add a new class Student.cs inside the Models folder.

using System;
using System.ComponentModel.DataAnnotations;
using System.ComponentModel.DataAnnotations.Schema;
namespace NET_Core_API.Models
{
public class Student
{
[Key]
[DatabaseGenerated(DatabaseGeneratedOption.Identity)]
public Guid ID { get; set; }
public string FirstName { get; set; }
public string LastName { get; set; }
}
}

Step 4: Define Context File.
Now create CS EntityContext file in the project.
Copy the below code and paste it in context file. Change the code as per your need.
using Microsoft.EntityFrameworkCore;
using NET_Core_API.Models;
namespace NET_Core_API
{
public class EntityContext : DbContext
{
public EntityContext(DbContextOptions options)
: base(options)
{
}
public DbSet Students { get; set; }
}
}
using NET_Core_API.Models;
namespace NET_Core_API
{
public class EntityContext : DbContext
{
public EntityContext(DbContextOptions options)
: base(options)
{
}
public DbSet

Step 5: Register the context file.
Now go to Startup.cs file and register our context in the Startup.cs file.
Copy the below code and paste it in ConfigureServices function.
services.AddDbContext(opts => opts.UseSqlServer(Configuration["ConnectionString:DB"]));

Step 5: Install EFCore.SQL.
Go to NuGet package manager and install Microsoft.EntityFrameworkCore.SqlServer package.


Step 6: Create DataBase
Go to NuGet console and run the command
Add-Migration NAME


Now let’s apply these changes to the database.
Run the following command
Update-Database

This will update the database based on our models.
Now go to database and check, it will create the DB.

1 comment:
Such amazing blog post!!!
Distributor Locations in Mumbai
Distributors Profile in Delhi
Distributor Lists in Gurugram
Geo-locations in Gurugram
Post a Comment