After the Unified Interface, Now it is possible to customize this pop window.
Note: The capability to customize the opportunity close form is supported only in the sales app built on Unified Interface.
Step 1: Enable customization of the Opportunity Close form.
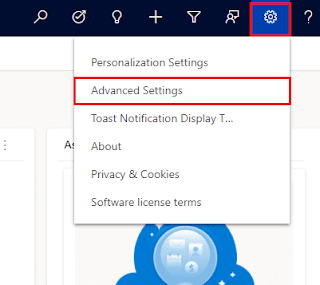
Step 1.1: In the navigation bar of your app, click on the Settings icon and then click on Advanced Settings. It will open a Business Management Setting page.

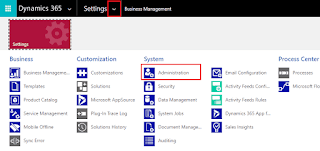
Step 1.2: Now go to Settings > Administration.
Step 1.3: Click on system setting. It will open a pop-up window.
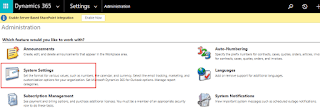
Step 1.4: Now go to the Sales tab, and then set the customize close opportunity form field to Yes and then click ok.


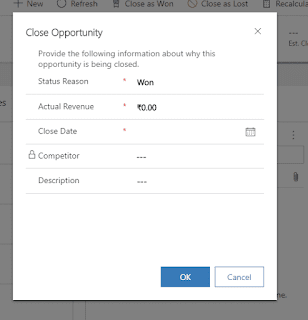
Now check in Sales app. Create one opportunity and try to close it won/lost then pop-up will looks like this.

Note: If you're using a custom app, then above step-1 is not enough to enabling the customization of opportunity close form, you need to add the Opportunity Close entity to the custom app in the app designer.
Step 2: Add Opportunity Close entity to the custom app module.
Step 2.1: In the navigation bar of your app, click on the Settings icon and then click on Advanced Settings. It will open a Business Management Setting page.
Step 2.2: Now go to Settings > "Apps under Application".

Step 2.3: Go to your application. Here my custom app is CRM_HUB_test. Click on Open in App Designer option. It will open a app designer.


Step 2.4: Click on Add, and then under Artifacts, click on Entities.

Step 2.5: In the Search Entities box, type Opportunity Close, select the Opportunity Close entity.
Hover the mouse in right side then select Add All Assets option.

Step 2.6: Now click on Save and then Publish it.

Now check in your custom app. Create one opportunity and try to close it won/lost then pop-up will looks like this
.
Now you are able to customize the pop-up form. So let's start to customize the form.
Step 3: Customize the Opportunity Close entity.
Step 3.1: To open solution, go to advance setting. It will open a Business Management Setting page.
Here, I am opening Default solution but if you have a separate solution then open that solution and then add opportunity close entity in that solution.
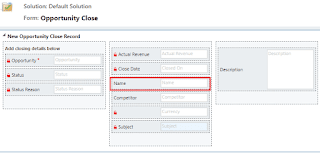
Step 3.2: Now go to opportunity close entity and find opportunity close entity form. Open this form.

Now you can customize this form or can apply JS in this form. Here I added one text field.

No comments:
Post a Comment