Create Web API with Entity FrameWork Code first Approach in ASP.NET Core - Part 2

This is the Part-2 of our article. If you haven't read part-1 yet then click Here to go.

In this article, I will explain you how to use Entity FrameWork with Code First Approach in our .NET Core project.


Step 1: Create a .NET Core project. 
Firstly open the visual studio and create a project in .NET Core. Here i am using VS19.

In the next window, Give the Name of your project. and then click on create button.


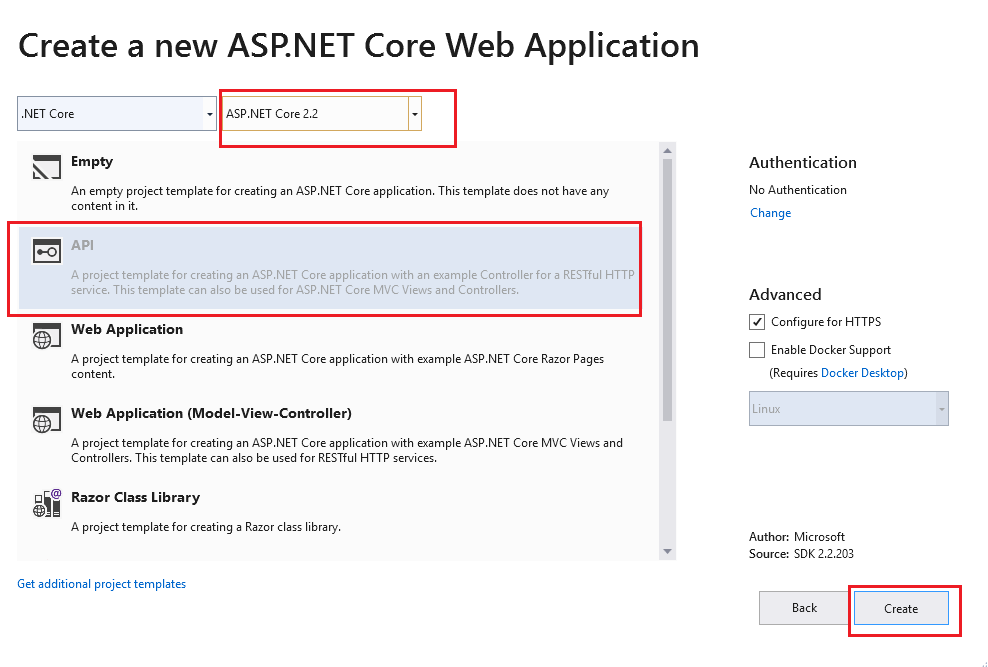
In the another next window, choose the type of project. Here i am selecting API. Also, from the drop-down choose ASP.NET Core 2.2. After all that, just click the Create button and then project will load.
Step 2: Add Connection String.
Go to appsettings.json file. and Add Database connection in this file as show in below.
modify the Connection String Property as per your need.
{
   "Logging": {
      "LogLevel": {
           "Default": "Warning"
      }
    },
  "ConnectionString": {
        "DB": "server=.;database=StudentDB;User ID=USER_NAME;password=PASSWORD;"      },
  "AllowedHosts": "*"
}
Step 3: Defining the Models.
Create a new folder Models within the root of the application. and add a new class Student.cs inside the Models folder.
Copy the below code and modify as per your need.
using System;
using System.ComponentModel.DataAnnotations;
using System.ComponentModel.DataAnnotations.Schema;

namespace NET_Core_API.Models
{
       public class Student
      {
          [Key]
          [DatabaseGenerated(DatabaseGeneratedOption.Identity)]
          public Guid ID { get; set; }
          public string FirstName { get; set; }
          public string LastName { get; set; }
      }
}

Step 4: Define Context File.
Now create CS EntityContext file in the project.
Copy the below code and paste it in context file. Change the code as per your need.
using Microsoft.EntityFrameworkCore;
using NET_Core_API.Models;

namespace NET_Core_API
{
     public class EntityContext : DbContext
     {
        public EntityContext(DbContextOptions options)
             : base(options)
       {
       }
        public DbSet Students { get; set; } 
    }
}

Step 5: Register the context file.
Now go to Startup.cs file and register our context in the Startup.cs file.
Copy the below code and paste it in ConfigureServices function.
services.AddDbContext(opts => opts.UseSqlServer(Configuration["ConnectionString:DB"]));

Step 5: Install EFCore.SQL.
Go to NuGet package manager and install Microsoft.EntityFrameworkCore.SqlServer package.


Step 6: Create DataBase
Go to NuGet console and run the command
Add-Migration NAME


Now let’s apply these changes to the database.
Run the following command
Update-Database


This will update the database based on our models.

Now go to database and check, it will create the DB.


Create Web API with Entity FrameWork Code first Approach in ASP.NET Core - Part 1

Hello folks, I am writing an article on WEB API with Entity FrameWork in .NET Core.

This article is divided into 3 parts:


So this is the 1st article where i will explain about .NET Core, Entity-framework

What is .NET Core :

.NET Core is a cross platform, open source re-implementation of the .NET Framework. It is actively maintained by Microsoft. It is cross-platform framework to build applications for all operating system including Windows, Mac, and Linux.

What is Entity FrameWork :

Prior to .NET 3.5, developers often used to write ADO.NET code to save or retrieve application data from the underlying database. We used to open a connection to the database, create a DataSet  to fetch or submit the data to the database, convert data from the DataSet to .NET objects or vice-versa to apply business rules. This was a cumbersome and error prone process. Microsoft has provided a framework called "Entity Framework" to automate all these database related activities for your application. 
Entity Framework is an object-relational mapper (O/RM) that enables .NET developers to work with a database using .NET objects.

Entity FrameWork Core : 

It is the new version of Entity Framework after EF 6.x. It is open-source, lightweight, extensible and a cross-platform version of Entity Framework data access technology. It is an enhancement to ADO.NET that gives developers an automated mechanism for accessing & storing the data in the database. 
EF Core supports two development approaches 1) Code-First 2) Database-First.

In the Code-First Approach, Entity Framework Core API creates the database and tables using migration based on the conventions and configuration provided in your domain classes. This approach is useful in Domain Driven Design (DDD).
In the simple language, we can say it create our DataBase from class using commands.
In the Database-First Approach, Entity Framework Core API creates the domain and context classes based on your existing database using Entity Framework Core commands. This has limited support in Entity Framework Core as it does not support visual designer or wizard.
In the simple language,we can say it create classes from our DB.


Prerequisites:
For this series you will need:
  • Sql Server (SSMS)
  • .NET SDK
  • Visual Studio 2017 or Visual Studio 2019.


Hide Web Page After Login the Portal.

Hello folks, Sometime in D365 portal, we have the requirement to hide web page after login mean web page can access only by the anonymous user and after login the portal, web page is not visible to the user.
As you can see in below snapshot, Before login, page is visible
but after login page is not visible.

This kind of requirement can be achieved through code using js. Here i am assuming you have created your web page in the portal.
Now follow the below steps to achieve this requirement.

Step 1:  Go to Portal > Web Template in CRM. Open Header Web Template.


Step 2: Copy the below code and change the name of a web page which you want to hide

<script src="//ajax.googleapis.com/ajax/libs/jquery/1.9.1/jquery.min.js"></script>
<script type="text/javascript">
var userEmail = '{{user.emailaddress1}}' ;
// Here my web page name is Register.
if (userEmail)
{
$('a:contains("NAME_OF_WEB_PAGE")').parent().next().hide();
 $('a:contains("NAME_OF_WEB_PAGE")').hide();
}
else
{
 $('a:contains("NAME_OF_WEB_PAGE")').parent().next().show();
 $('a:contains("NAME_OF_WEB_PAGE")').show();
}
</script>

Step 3: Paste this code at the end of Header Web Template code.


Now check your portal. It's working.

Hope this article helps you!


If you want to hide page for the anonymous user and visible for an authenticated user then Click Here to know that.

Open Web/Classic UI from Unified Interface UI in D365 CRM

Hello folks, MS has implemented new Unified Interface for D365 CRM. Now when you open CRM, By-default it opened Unified Interface View.
The new Unified Interface is a bridge between web and mobile platforms, providing a consistent experience across devices by utilizing a responsive design for optimal viewing and interaction regardless of the device's size or orientation.
However, this new Unified Interface is quite confusing for Developers. Navigation looks good but it’s complex for Developers as they have been habituated with Classic UI.
Here in this article, I will explain to you, How we can get Classic UI back from new Unified Interface.

#Trick 1: 
By appending  "?forceClassic=1" parameter at the end of your organization URL, we can open Web/Classic View.
For Example - Organization URL is - "https://xyz.crm.dynamics.com/main.aspx"
Now after append "?forceClassic=1" parameter
it becomes - https://xyz.crm.dynamics.com/main.aspx?forceClassic=1.

Now hit the URL in the browser and then it will open CRM in Web/Classic View.


#Trick 2:  Using System Settings. It makes web/classic view the default view of CRM.

Step 1: Open your organisation.
 Step 2: Now Click on Setting Icon > Advance settings.
 Step 3: Go to Setting > Administrator.
Step 4: Now click on System Setting. it will open a pop-up.
Step 5: Now find the option "Use the new Unified Interface only (recommended)" under general setting and set its value to No and then click ok.

 Now open your organization. By default, it open web/classic view.


Hope this article helps you!

SharePoint Integration with D365 Portal.

Hello Folks, Oct'18 release of Microsoft Dynamics 365 Portal includes so many number of features, one of the best features is management of SharePoint documents inside Dynamics Portals. or can say we can Integrate the SharePoint with Portal.
SharePoint documents for portals provides the following features like Upload, Download, Delete the document in a SharePoint Library via Portals.Portal users can also create sub-folders to organize their documents.

Follow the steps to Integrate the SharePoint with Portal :

Step 1: Enable Document Management functionality in Dynamics 365 :

Document Management functionality by using server-based SharePoint integration allows Dynamics 365 (online) and SharePoint Online to perform a server-to-server connection. To enable server-based SharePoint integration with Dynamics 365 (online) and SharePoint Online, follow these steps.

Step 1.1: Go to Settings > Document Management.

Step 1.2: Click Enable server-based SharePoint integration. 
Step 1.3: A Pop-Up of Enable server-based SharePoint Integration will appears. Here click on Next button.
Step 1.4: Make sure Online is selected under 'Select where your SharePoint sites are located' and then click Next.

Step 1.5: Now enter the URL for the SharePoint site. The URL should be like 'https://name.sharepoint.com'. Click on Next.

Step 1.6: Site should be valid. Now click on Finish.

Step 2: Set up SharePoint integration from Portal :

Step 2.1: Go to Portal Admin Center.

Step 2.2: Go to Set up SharePoint Integration and click on 'Enable SharePoint integration'

Step 2.3: A Pop-Up will come and then click on Enable. This will enable the portal to communicate with SharePoint.

Step 2.4: Now You will also be redirected to provide your consent for the changes to be made in the Azure AD application. Click on Accept as show in below Snapshot.

After Successfully Enabled the integration your screen look like this :

Step 3: Enable document management for Entities :

Now you have to enabled the document management for the entity for which you want to manage the documents from portal.

Step 3.1: Go to Settings > Document Management.
Step 3.2: Click on 'Document Management Settings'.
Step 3.3: Select the entities for which you want to manage the documents and Enter the SharePoint URL and then click on Next.

Step 3.4: Check Based on entity to have document libraries and folders that are based on the Dynamics 365 Account entity automatically created on the SharePoint site. Users will not be prompted to create them.
If you don't want folders automatically created, clear the Based on entity check box.
Now click on Next.


Step 3.5: The Document Management Settings wizard shows the creation status of the document libraries and then click on Finish.

Step 4: Configure the Entity Form in Portal from where you want to manage the documents in SharePoint.

Here i am considering, you know how to Update/Edit the records from Portal but if you don't know about this then Click Here to know that.

Make sure Entity Permission is checked for the Entity Form.

Step 4.2: Now after this, Open the form (from where you want to manage the documents in Portal) in Form Editor from CRM side.

Step 4.3: Insert the Sub-Grid on form.

Step 4.4: Open the properties of Grid. Under Data Source, select Document Locations from the Entity list and select Active Document Locations from the Default View list. 

Step 4.5: Save and publish the form once the sub-grid is added and configured. 

Step 5: Create appropriate entity permission :

Two Entity Permission would be required to view and upload the documents.

1st Entity Permission :-

Step 5.1: Go to Portal > Entity Permission. Create a new entity permission for the Entity on which you applied Grid. 


Step 5.2: Now give the web roles as per your requirement.


2nd Entity permission :-
Step 5.2: Create a new Entity Permission for Document Location Entity with Scope set to Parent.


Now check in your Portal. You can now upload, view, download, delete the document from SharePoint via portal.

Restrict D365 Portal access by IP address.

We all know that D365 Portal is public i.e. it can be accessible by anyone from any computer. Now in Oct'18 release of D365 Portal, we can restrict access to our portal from IP addresses. We will provide some IP address in allow list. When a request to the portal is generated from any user, their IP address is evaluated against the allow list. If the IP address is not on the list, the portal displays a web page with an HTTP 403 status code.
 Once you add an IP address to the allow list, the portal will be accessible to the specified IP address only. If you try to access the portal from any other IP addresses, access will be denied and a web page with an HTTP 403 status code is displayed. The content of this web page is static and cannot be modified.

 NOTE: You must specify a public IP address that can be accessed by the portal. Private IP address can't be accessed by the portal.

 Follow the steps to do this:
 Step 1: Go to Portal Admin Center.

 Step 2: Now go to Set up IP address restriction.

 Step 3: Now select Add an IP address (+).


Step 4: In the Add an IP address window, Enter the following values:

  • Select type of IP address: Select whether the IP address is IPv4 or IPv6.
  • Specify IP address in CIDR notation: Specify the IP address in CIDR notation.

Now Click on Configure.


Now we have List of IP address which can access portal.