Use Jquery DataTable to Create a custom Sub-Grid in MS Dynamic CRM.

Sometime we need to show our data in table format. We should use Jquery DataTable to show the data in sub-grid (Table) format. In this post i will explain step by step, how we can create a DataTable.

Step 1: Copy the below code and paste this code in your editor. And change the code as per your need. Here i will create a DataTable of Case Entity.

<html>
<head>
    <title>MS Dynamic CRM</title>
 
    <script src="ClientGlobalContext.js.aspx" type="text/javascript"></script>
<link rel="stylesheet" href="https://cdn.datatables.net/1.10.16/css/jquery.dataTables.min.css">
<link rel="stylesheet" href="https://cdn.datatables.net/select/1.2.5/css/select.dataTables.min.css">
<link rel="stylesheet" href="https://maxcdn.bootstrapcdn.com/bootstrap/3.3.7/css/bootstrap.min.css">
<script src="https://code.jquery.com/jquery-1.12.4.js"> </script>
<script src="https://cdn.datatables.net/1.10.16/js/jquery.dataTables.min.js"> </script>
 
<script>

  var dataSet;
  var arrData = [];

$(document).ready(function() {
// Get the data in Json format, Change the URL as per your need.
  var entityName ="incident"; // This is the Entity name of Case.
var  url = window.parent.Xrm.Page.context.getClientUrl() + "/api/data/v8.2/" + entityName +"s?$select=title,ticketnumber,prioritycode";  
var myData = [];
var req = new XMLHttpRequest();
req.open("GET",url, false);
req.setRequestHeader("OData-MaxVersion", "4.0");
req.setRequestHeader("OData-Version", "4.0");
req.setRequestHeader("Accept", "application/json");
req.setRequestHeader("Content-Type", "application/json; charset=utf-8");
req.setRequestHeader("Prefer", "odata.include-annotations=\"*\"");
req.onreadystatechange = function() {
if (this.readyState === 4) {
req.onreadystatechange = null;
if (this.status === 200) {
  myData = JSON.parse(this.response);
  dataSet=myData.value;   
} else {
Xrm.Utility.alertDialog(this.statusText);
}
}
};
req.send();
   
  // Convert Json data into 2-d Array
   arrItems = [];   
$.each(dataSet, function (index, value) {
arrItems.push(value.title);
arrItems.push(value.ticketnumber);
   // arrItems.push(value.prioritycode); or
arrItems.push(value["prioritycode@OData.Community.Display.V1.FormattedValue"]) ; // For OptionSet value
arrData.push(arrItems); // Push The Values Inside the Array to Create 2-D Array
arrItems = [];
});
   
table(); // Call a table function to create table.
});

function table() {
$('#customdatatable').DataTable( {
        data: arrData,
        columns: [
            { title: "Title" },  // Change the column name as per your need.
{ title: "Ticket Number" },
{ title: "Priority" }         
        ]
    } );
}

</script>
</head>

<body style="word-wrap: break-word;">
 
<table id="customdatatable" class="display" width="100%"></table>

</body>
</html>

Step 2: After make changes in code, Create a new HTML Web-resource and Upload the code in this web-resource and check the table.


How to get GUID of selected records from home page entity view using Java-Script in MS Dynamic CRM.

Sometime we need to apply some operations on selected records in home page entity view by clicking on custom button. To apply operations, firstly we need to get GUID of these selected records then we can apply any kind of operations of these records. In this post, i will show you how to retrieve GUID of selected records.


Step 1: Copy the below code and paste it in your Java-Script file .

function selectedRecord(selectedIds) {
    if (selectedIds != null && selectedIds != "") {
        var strIds = selectedIds.toString();
        var arrIds = strIds.split(",");
        for (var i = 0; i < arrIds.length; i++) {          
alert(arrIds[i]);
// do your operations here
        }       
    }
    else {
        alert("No records selected!");
    }
}

Step 2: Now Add custom button in your home page using Ribbon Workbench Tool.


Step 3: Now Add New Command for this button. And after that, add new actions for this command.


Step 4: In this Action, add lib. and give the Function Name.Here our function is selectedRecord. Now click on parameter to get selected records GUID.

Step 5: Click on Add to add a new parameter. And then select the CRM Parameter option.


Step 6: Value of parameter is SelectedControlSelectedItemsIds as show in below Snapshot.

Step 7: Now select your command in command bar and then publish your solution.


Now do the testing. Select the records and then click on button. you will get GUID of these selected records.

How to Execute Workflow using Java-Script (JS) in MS Dynamic CRM.

Hello guys....Sometime we need to execute workflow using Java-Script.

Prerequisite :
    * Create a workflow which you want to execute. And this workflow must be On-demand.

Note : 
  • Here i am using ActiveX object to retrieve the GUID of workflow. Chrome and Firefox does not support ActiveX object but this object is supported by Internet Explorer on Windows. The below code works only in Internet Explorer. But if you want to execute workflow in all browser then you have to hard-code the GUID of Workflow and remove the getWorkflowId function.

Now copy the below code and paste this in your code.

function Workflow()
{
var workflowName = "WorkFlow Name";
var WF_ID = getWorkflowId(workflowName); // only supported in IE
var entityId = Xrm.Page.data.entity.getId();  // Give Record's GUID on which you want to execute this workflow.
RunWorkflow(WF_ID,entityId);
}

function getWorkflowId(workflowName) {
var name=workflowName;
var serverUrl = Xrm.Page.context.getClientUrl();
var odataSelect = serverUrl + "/xrmservices/2011/OrganizationData.svc/WorkflowSet?$select=WorkflowId&$filter=StateCode/Value eq 1 and ParentWorkflowId/Id eq null and Name eq '" + name +"'";

    var xmlHttp = new XMLHttpRequest();
    xmlHttp.open("GET", odataSelect, false);
    xmlHttp.send();

    if (xmlHttp.status == 200) {
        var result = xmlHttp.responseText;
        var xmlDoc = new ActiveXObject("Microsoft.XMLDOM");
        xmlDoc.async = false;
        xmlDoc.loadXML(result);        
        return xmlDoc.getElementsByTagName("d:WorkflowId")[0].childNodes[0].nodeValue;
    }
}

function RunWorkflow(WF_ID,entityId)
     
    var _return = window.confirm('Do you want to execute workflow.');
    if (_return) {
        var url = Xrm.Page.context.getClientUrl();
        var recordId = entityId;
    var workflowId = WF_ID;
        var OrgServicePath = "/XRMServices/2011/Organization.svc/web";
        url = url + OrgServicePath;
        var request;
        request = "<s:Envelope xmlns:s=\"http://schemas.xmlsoap.org/soap/envelope/\">" +
                      "<s:Body>" +
                        "<Execute xmlns=\"http://schemas.microsoft.com/xrm/2011/Contracts/Services\" xmlns:i=\"http://www.w3.org/2001/XMLSchema-instance\">" +
                          "<request i:type=\"b:ExecuteWorkflowRequest\" xmlns:a=\"http://schemas.microsoft.com/xrm/2011/Contracts\" xmlns:b=\"http://schemas.microsoft.com/crm/2011/Contracts\">" +
                            "<a:Parameters xmlns:c=\"http://schemas.datacontract.org/2004/07/System.Collections.Generic\">" +
                              "<a:KeyValuePairOfstringanyType>" +
                                "<c:key>EntityId</c:key>" +
                                "<c:value i:type=\"d:guid\" xmlns:d=\"http://schemas.microsoft.com/2003/10/Serialization/\">" + recordId + "</c:value>" +
                              "</a:KeyValuePairOfstringanyType>" +
                              "<a:KeyValuePairOfstringanyType>" +
                                "<c:key>WorkflowId</c:key>" +
                                "<c:value i:type=\"d:guid\" xmlns:d=\"http://schemas.microsoft.com/2003/10/Serialization/\">" + workflowId + "</c:value>" +
                              "</a:KeyValuePairOfstringanyType>" +
                            "</a:Parameters>" +
                            "<a:RequestId i:nil=\"true\" />" +
                            "<a:RequestName>ExecuteWorkflow</a:RequestName>" +
                          "</request>" +
                        "</Execute>" +
                      "</s:Body>" +
                    "</s:Envelope>";

        var req = new XMLHttpRequest();
        req.open("POST", url, true)
        // Responses will return XML. It isn't possible to return JSON.
        req.setRequestHeader("Accept", "application/xml, text/xml, */*");
        req.setRequestHeader("Content-Type", "text/xml; charset=utf-8");
        req.setRequestHeader("SOAPAction", "http://schemas.microsoft.com/xrm/2011/Contracts/Services/IOrganizationService/Execute");
        req.onreadystatechange = function () { assignResponse(req); };
        req.send(request);
    }
}

function assignResponse(req) {
    if (req.readyState == 4) {
        if (req.status == 200) {
            alert('successfully executed the workflow');
        }
    }
}


Hope this code helps you....

How to Set Up custom Domain of D365 Portal.

In this post, I will explain how to remove *.microsoftcrmportals.com domain and add our custom domain of D365 Portal. 

Prerequisite to Set Up Custom Domian of D365 Portal :

* You should have the Licensed Organization, In Trial organization you don't have any option to set up custom domain.
* Purchase a Custom Domain from any other company like GoDaddy which you want to set up with your portal.
* After purchase Custom Domain, you also need SSL Certificate. This certificate will be issue by the same company from where you have purchased the domain.

You have to perform some steps to issue SSL. Firstly you have to generate .CSR file to issue SSL from company

Step 1: Download the tool DigiCertUtil and Install it in your system or Download it from Here.

Step 2: Now open this tool and click on Create CSR.


Step 3: After click on create CSR, Provide needful information and then click on Generate. Certificate type must be SSL.

Step 4: Now a popup will come and then click on  Save to File.  

Now you have .CSR file to generate the SSL certificate. Give this .CSR to company and then they will issue SSL Certificate.

To Setup Custom Domain of D365 Portal. 

Step 1: Go to Portal Admin Section. Click on Set up custom domains and SSL. After click a pop-up will come

Step 2: Now select the Option Upload a new certificate and then upload the SSL Certificate which you have Issued. And then click on Next button.

Step 3: Now select the Option Add a new host name and Give your domain name which you want to set. And then click on Next button.


Step 4: Now you are on Binding Step. Here you can see the information which you have bound with the portal and then click on Next button.

Step 5: Now you are on Confirmation step. Here you can see your message and then click on finish.


Now you have successfully set up your custom domain of D365 Portal.  

How to perform Registration process through OTP in D365 Portal / ADX Studio Portal.

In D365 Portal / ADX Studio Portal, If you want to perform registration process through OTP then follow the below steps. If you want to perform registration process through E-mail then click Here.

Step 1: Create a workflow which create Invitation record. This workflow will run after creation of Contact.


Step 2: Now write a plugin which is used to generate the OTP code as show in below Snapshot. In this code:

  • We generate the OTP code using Random function.
  • Put this OTP code in Invitation Code field and Update the Invitation. 


Step 3: Register the plugin on creation of Invitation and the execution of plugin will be PostOperation. 

Step 4: Now write a another workflow which is used to Send SMS to User's Phone number. This workflow will execute on change of Invitation code.

Now the OTP comes in your phone Number and Enter the OTP in Portal's Invitation Code.


 Now you are able to register the user through the OTP.


Cache Problem In D365 Portal / ADX Studio Portal.

Sometime we are facing the cache problem in D365 Portal / ADX Studio Portal. This kind of issue we faced when we updated anything directly within the CRM and changes not reflected within the Portal. To solve this issue, we have two ways:

First Way :
Go to CRM solution and click on the entity on which you facing this cache problem. Now go to "Change Tracking" option and enable this option as show in below snapshot. Portal use this feature to refresh the portal cache for a specific entity.


Second Way:
Step 1: Go to Poral and login with admin credential.

Step 2: Now navigate to the URL : <Portal URL>/_services/about

Step 3: Now click on Clear Cache button.

Retrieve the data using Odata Query in D365 Portal / ADX Studio Portal.

Hello Guys.....With the help of Odata Query we can retrieve the data in Portal from CRM and on the basis of this data we can apply some validation on it.
Here i will show you, How to retrieve the data from CASE entity using Odata query.

Before Moving forward, if you don't know, how to apply client side validation then click Here to know that.

Step 1: Go to Portal > Entity List. Create a new Entity List for Case Entity.


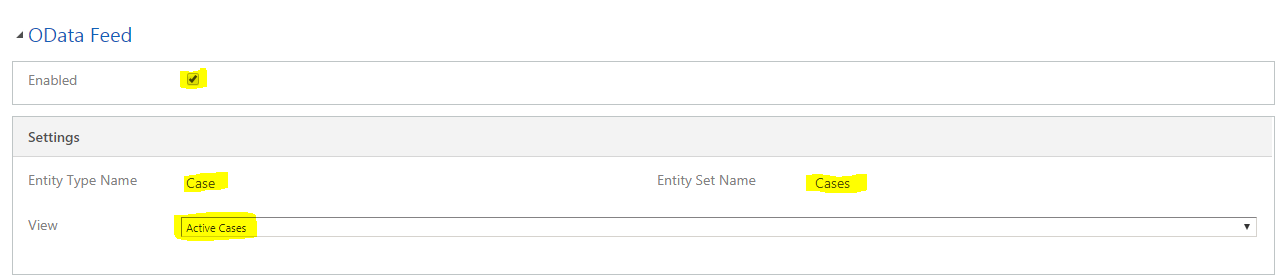
Step 2: Now scroll down this record and go to Odata Feed Section.
  • Click the Enabled Checkbox to enable the odata.
  • Give the Entity Type Name and Entity Set Name.
  • Select the view from which you want to retrieve the data or you can set your own custom view.

Step 3: Now, To retrieve the data, Hit the URL in browser.
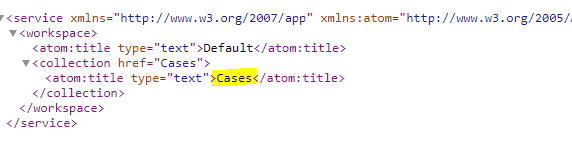
  • URL : Portal_URL/_odata : This URL give the list of all entity set for which you have enabled the Odata.
  • URL : Portal_URL/_odata/Entity_Set_Name : This URL retrieve the data 


How to use odata to apply validation:

Here I applied validation on case like user not able to create case with same Title.  Check the below code and you can change this code as your requirement.


if (window.jQuery) {
   (function ($) {
      $(document).ready(function () {
         if (typeof (Page_Validators) == 'undefined') return;
         // Create new validator
         var newValidator = document.createElement('span');
         newValidator.style.display = "none";
         newValidator.id = "titleValidator";
         newValidator.controltovalidate = "title";
         newValidator.errormessage = "<a href='#title_label'>This Case has been already generated.</a>";
         newValidator.validationGroup = ""; // Set this if you have set ValidationGroup on the form
         newValidator.initialvalue = "";
         newValidator.evaluationfunction = function () {
       
var count =   GetCase();
            if (count > 0 ) 
              return false;   // Return false mean apply validation.
             else 
              return true;   // Return true mean successful.         
         };
         // Add the new validator to the page validators array:
         Page_Validators.push(newValidator);
         // Wire-up the click event handler of the validation summary link
         $("a[href='#title_label']").on("click", function () { scrollToAndFocus('title_label','title'); });
      });
   }(window.jQuery));
}

function GetCase(){
  var count = 0;
  var title=$("#title").val();

$.ajax({
    type: "GET",
    contentType: "application/json; charset=utf-8",
    datatype: "json",
    url: "~/_odata/Cases?$filter=title eq '"+title+"'",
    beforeSend: function(XMLHttpRequest) {
        XMLHttpRequest.setRequestHeader("Accept", "application/json");
    },
    async: false,
    success: function(data, textStatus, xhr) {
     count = data.value.length;        
    },
    error: function(xhr, textStatus, errorThrown) {
        Xrm.Utility.alertDialog(textStatus + " " + errorThrown);
    }
  
});

return count;
}


Note: Refer the below link for complex Odata Query.
    https://msdn.microsoft.com/en-us/library/gg309461(v=crm.7).aspx


Click Here to know, Cache Problem In D365 Portal / ADX Studio Portal.

Apply Client Side validation in D365 Portal / ADX Studio Portal.

We have to use JS to apply client side validation in portal. Here i am making a field mandatory in Portal using JS but this field is not mandatory in CRM. This kind of requirement comes when a field is not mandatory in CRM but you have to make a field mandatory.

Step 1: Copy the below code and paste it in Notepad.


// Apply Client Side Validation on FieldName
if (window.jQuery) {
   (function ($) {
      $(document).ready(function () {
         if (typeof (Page_Validators) == 'undefined') return;
         // Create new validator
         var newValidator = document.createElement('span');
         newValidator.style.display = "none";
         newValidator.id = "FieldNameValidator";
         newValidator.controltovalidate = "FieldName";
         newValidator.errormessage = "<a href='#FieldName_label'>FieldName is required field.</a>";
         newValidator.validationGroup = ""; // Set this if you have set ValidationGroup on the form
         newValidator.initialvalue = "";
         newValidator.evaluationfunction = function () {
            var FieldName = $("#FieldName").val();       
if (FieldName == "")       
             return false;  // return false mean apply validation            
else 
             return true;   // return true mean successful         
         };
         // Add the new validator to the page validators array:
         Page_Validators.push(newValidator);
         // Wire-up the click event handler of the validation summary link
         $("a[href='#FieldName_label']").on("click", function () { scrollToAndFocus('FieldName_label','FieldName'); });
      });
   }(window.jQuery));
}

Step 2: Now modify this code as your requirement.
  • Here Replace the FieldName with your field name.
Step 3: Now apply this code on portal's page as show in below ScreenShot.


Now Check the Portal.

To apply the Asterisk (*) Sign using custom JS : 
 $('#FieldName_label').after('<span id="spanId" style="color: red;"> *</span>');  


Click Here to know, Retrieve the data using Odata Query in D365 Portal / ADX Studio Portal.