Sometime we have a requirement like user can able to Upload, Download ,Delete ,Edit documents from portal. In this post i will show you how to achieve this requirement. we have Two ways to achieve this scenario. I will explain both of ways one by one.
Before moving forward, here i am considering, you have basic knowledge of entity form (like Create/Update/Delete records). If you do not know about this then click Here to know that.
Step 1: Open CRM and add Notes/Timeline section in your CRM form on which you want to apply Notes from portal.

Step 2: Make Notes the default tab.

Step 3: Now open Entity form in portal (portal > entity form) on which you want to add Notes section. Mode of Entity Form should be Edit. (Because this method is used in case of when we update the records from portal )

Step 4: Scroll down your Entity Form record and reach at Entity Form Metadata Sub-grid.
 Step 5: Click on + icon to create a new Entity Form Metadata.
Type: It must be Notes.
Create Enabled: Set it true to create note from Portal.
Edit Enabled: set it true to edit the notes from Portal.
Delete Enabled: set it true to delete the notes from Portal.

Step 6: Now scroll up Entity Form and make sure Entity Permission checkbox should be checked.

Step 7: Now go to Portal > Entity Permission.

Step 8: Create a new Entity Permission.
Name: Give the name of permission.
Entity Name: Select Note entity.
Website: Select website on which you are working.
Scope: Select Global Scope and checked all check-boxes.

Step 9: Scroll Down the Record and reach Web Role Subgrid.

Step 10: Add web role here for this Entity Permission. The Web Role associated to the Portal Contact should also be associated with this Entity Permission. here i am admin that's why i added admin role.

Now Check in portal. Hope you are able to see Add Notes button as show in below Screenshot.
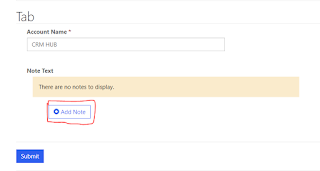
When you click on Add Notes, a popup will come, here you can give your Description and attach any documents.
After attach document, Now you are able to see your Notes/Documents.

Now to Delete or Edit the Document, Click on icon as show in below screenshot. Here you can Delete and Edit your attachment also.

Now to Download the Document, just click on document.
Step 1: Now open Entity Form record from which you want to attach documents from portal.
Step 2: Scroll down the record and reach at Add Attach File Section.
Attach File: Select this option to upload document from portal.
Allow Multiple Files: Select this option to upload multiple file in one time.
Attach File Storage Location: Give Note attachment.
Attach File Save Option : Give Notes.

Now Check in portal. you can see a upload file option. Here you can select the file which you want to upload.

After that you have to submit the form to upload the file.

Now to see your uploaded Attachments:
Step 3: Open CRM and add Notes/Timeline section in your CRM form from which you want to see Notes from portal.
Step 4: Make Notes the default tab.
Now check in Portal. you are able to see your uploaded documents.

To download the Notes :
Just Click on your uploaded document. If you got Mess like Not found as show in below Snapshot
then follow the below step otherwise you can skip this.

Step 5: Now open Entity Form record from which you want to download the documents from portal.
Step 6: Now scroll down Entity Form and make sure Entity Permission checkbox should be checked.
Step 7: Now go to Portal > Entity Permission.
Step 8: Create a new Entity Permission.
Name: Give the name of permission.
Entity Name: Select Note entity.
Website: Select website on which you are working.
Scope: Select Global Scope and checked all check-boxes.
Step 9: Scroll Down the Record and reach Web Role Subgrid.
Step 10: Add web role here for this entity permission. The Web Role associated to the Portal Contact should also be associated with this Entity Permission. here i am admin that's why i added admin role.
Now you are able to download the Notes.
But with this 2nd Method, you are not able to Edit and Delete the Notes.
So that is based upon your requirement, you can use any method (method 1 or method 2).
Most Important Difference between method 1 and Method 2 is :
In method 1: you can upload document without submit entity form and you can Delete and Edit the notes also. but you can not upload multiple documents in one time. This method can be used when we update the records.
In method 2: To upload document, you have to submit Entity Form from portal but in this method you can upload multiple files. This method can be used when we Create/Update the records.
Issue Come: If you want to upload the document from CRM side and get visible in Portal side then during the upload document from CRM, add text *WEB*

Before moving forward, here i am considering, you have basic knowledge of entity form (like Create/Update/Delete records). If you do not know about this then click Here to know that.
Method 1 : This Method is used when we Edit/Update the records from Portal. We can not used this when we create the record.
Step 1: Open CRM and add Notes/Timeline section in your CRM form on which you want to apply Notes from portal.

Step 2: Make Notes the default tab.

Step 3: Now open Entity form in portal (portal > entity form) on which you want to add Notes section. Mode of Entity Form should be Edit. (Because this method is used in case of when we update the records from portal )

Step 4: Scroll down your Entity Form record and reach at Entity Form Metadata Sub-grid.

Type: It must be Notes.
Create Enabled: Set it true to create note from Portal.
Edit Enabled: set it true to edit the notes from Portal.
Delete Enabled: set it true to delete the notes from Portal.

Step 6: Now scroll up Entity Form and make sure Entity Permission checkbox should be checked.

Step 7: Now go to Portal > Entity Permission.

Step 8: Create a new Entity Permission.
Name: Give the name of permission.
Entity Name: Select Note entity.
Website: Select website on which you are working.
Scope: Select Global Scope and checked all check-boxes.

Step 9: Scroll Down the Record and reach Web Role Subgrid.

Step 10: Add web role here for this Entity Permission. The Web Role associated to the Portal Contact should also be associated with this Entity Permission. here i am admin that's why i added admin role.

Now Check in portal. Hope you are able to see Add Notes button as show in below Screenshot.

When you click on Add Notes, a popup will come, here you can give your Description and attach any documents.
After attach document, Now you are able to see your Notes/Documents.

Now to Delete or Edit the Document, Click on icon as show in below screenshot. Here you can Delete and Edit your attachment also.

Now to Download the Document, just click on document.
Method 2: It can be used when we Create or Update the records from portal.
Step 1: Now open Entity Form record from which you want to attach documents from portal.
Step 2: Scroll down the record and reach at Add Attach File Section.
Attach File: Select this option to upload document from portal.
Allow Multiple Files: Select this option to upload multiple file in one time.
Attach File Storage Location: Give Note attachment.
Attach File Save Option : Give Notes.

Now Check in portal. you can see a upload file option. Here you can select the file which you want to upload.

After that you have to submit the form to upload the file.

Now to see your uploaded Attachments:
Step 3: Open CRM and add Notes/Timeline section in your CRM form from which you want to see Notes from portal.
Step 4: Make Notes the default tab.
Now check in Portal. you are able to see your uploaded documents.

To download the Notes :
Just Click on your uploaded document. If you got Mess like Not found as show in below Snapshot
then follow the below step otherwise you can skip this.
Step 5: Now open Entity Form record from which you want to download the documents from portal.
Step 6: Now scroll down Entity Form and make sure Entity Permission checkbox should be checked.
Step 7: Now go to Portal > Entity Permission.
Step 8: Create a new Entity Permission.
Name: Give the name of permission.
Entity Name: Select Note entity.
Website: Select website on which you are working.
Scope: Select Global Scope and checked all check-boxes.
Step 9: Scroll Down the Record and reach Web Role Subgrid.
Step 10: Add web role here for this entity permission. The Web Role associated to the Portal Contact should also be associated with this Entity Permission. here i am admin that's why i added admin role.
Now you are able to download the Notes.
But with this 2nd Method, you are not able to Edit and Delete the Notes.
So that is based upon your requirement, you can use any method (method 1 or method 2).
Most Important Difference between method 1 and Method 2 is :
In method 1: you can upload document without submit entity form and you can Delete and Edit the notes also. but you can not upload multiple documents in one time. This method can be used when we update the records.
In method 2: To upload document, you have to submit Entity Form from portal but in this method you can upload multiple files. This method can be used when we Create/Update the records.
Issue Come: If you want to upload the document from CRM side and get visible in Portal side then during the upload document from CRM, add text *WEB*


