The following instruction will help you to setup the ADX Studio Portal for your Dynamic CRM.
Step 1: Download the ADX Studio Setup. click Here to download the setup.
Step 2: After download, Install it in your system.
Step 3: Go to installed folder. By default its path is:
"C:\Program Files (x86)\Adxstudio\XrmPortals\7.0.0023\Customizations"
Step 4: Import ADXStudioInstaller.zip into your CRM.
Step 5: After import solution, you will see a ADXStudioInstaller button as shown in below screenshot. Click on it and accept license agreement.

Step 6: Select Website Gallery from upper right corner as shown in below screenshot.

Step 7: Select the Portal you want to install as show in below screenshot. Here i will install Retail Portal.

You can either run ADXPortal locally through Visual studio or you can host it on your IIS.
Here i will tell you how to run ADXPortal through Visual Studio:-
Step 1: Go to below mention path:
"C:\Program Files (x86)\Adxstudio\XrmPortals\7.0.0023"
Step 2: Copy Samples folder and paste it some other location because i like to keep a clean copy of it.
Step 3: Open the setup through Visual Studio and run it.
Step 4: For the First time, you need to fill CRM details as show in below screenshot. Click on check connection.
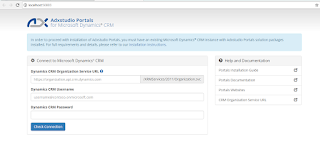
Step 5: Select Website from the list of ADXStudio Portal Website dropdown, that shows the list of available ADXStudio website that are installed in your Dynamics CRM, then click on Apply.

The Retail Portal look like this :

NOTE: Default user login credential for the portal will be:
UserName: administrator
Password: pass@word1
Configure Dynamics CRM for Your ADX Portal:-
Step 1: Download the ADX Studio Setup. click Here to download the setup.
Step 2: After download, Install it in your system.
Step 3: Go to installed folder. By default its path is:
"C:\Program Files (x86)\Adxstudio\XrmPortals\7.0.0023\Customizations"
Step 4: Import ADXStudioInstaller.zip into your CRM.
Step 5: After import solution, you will see a ADXStudioInstaller button as shown in below screenshot. Click on it and accept license agreement.

Step 6: Select Website Gallery from upper right corner as shown in below screenshot.

Step 7: Select the Portal you want to install as show in below screenshot. Here i will install Retail Portal.

Configure ADX Portal for Dynamics CRM:-
You can either run ADXPortal locally through Visual studio or you can host it on your IIS.
Here i will tell you how to run ADXPortal through Visual Studio:-
Step 1: Go to below mention path:
"C:\Program Files (x86)\Adxstudio\XrmPortals\7.0.0023"
Step 2: Copy Samples folder and paste it some other location because i like to keep a clean copy of it.
Step 3: Open the setup through Visual Studio and run it.
Step 4: For the First time, you need to fill CRM details as show in below screenshot. Click on check connection.

Step 5: Select Website from the list of ADXStudio Portal Website dropdown, that shows the list of available ADXStudio website that are installed in your Dynamics CRM, then click on Apply.

The Retail Portal look like this :

NOTE: Default user login credential for the portal will be:
UserName: administrator
Password: pass@word1
Click Here to see, How to Host ADXPortal through IIS.
2 comments:
Its great blog post!!!
Consumer Affinity
Dealer Sales in Mumbai
Neighborhood Profile in Delhi
Media Mix in Mumbai
Great post! Microsoft Dynamics CRM is a strong choice for businesses that need deep customization, seamless integration with Microsoft tools, and robust reporting. It really shines when it comes to handling complex enterprise workflows and customer data management. That said, some businesses prefer a simpler, more cost-effective option. In those cases, working with a Zoho CRM implementation partner USA can help companies set up tailored solutions, integrate essential tools, and scale efficiently without unnecessary complexity. Thanks for sharing these insights on Dynamic CRM!
Post a Comment