Hello folks, I am going to start a new tutorial list on 'ag-Grid in angular'. If you are planning to use ag-Grid in your angular project and bit confused on it or not able to understand ag-Grid properly🙇 then this post is going to really helpful for you.
Angular Introduction
Hello folks, Today we will introduce you about Angular. After reading this article you will get the understanding of Angular and it's version 💪.
you have been seen there are so many versions of angular like Angular JS, Angular 2, Angular 4,5,6,7,8,9.... and in future there will come many more. so there are some questions raised like
==> Should we learn all the angular's versions ?
==> Which version should i learn?
==> Is Angular and Angular JS different or same?
Let's discuss about it's version history and then you will get the understanding of angular.
How to show Loading Spinner icon using service in Angular Application
Hello folks, Today we will show you, How to show loading/spinner using service in our application.
you could also use Ngx spinner library but i would suggest to use custom created spinner in the project. Benefit of custom created spinner is we can easily modify it accordingly our requirement and also add some extra features with it.Prerequisites:
- Basic Knowledge of Angular 2 or higher
- Visual Studio Code
- Set up of angular environment.
- Bootstrap
How to open PowerApps Portal admin center
Hello Folks, Today i am going to show you How to open PowerApps Portal's Admin Center.
If you have worked upon D365 Portal then you should know about it. In the portal's admin center, we can perform advanced administrative actions on portals like SharePoint integration, Power BI integration and some other actions. The admin center is available after the portal is provisioned successfully.
Follow the below steps to open the portal's admin center.
Step 1: Sign in to PowerApps.
If you have worked upon D365 Portal then you should know about it. In the portal's admin center, we can perform advanced administrative actions on portals like SharePoint integration, Power BI integration and some other actions. The admin center is available after the portal is provisioned successfully.
Follow the below steps to open the portal's admin center.
Step 1: Sign in to PowerApps.
Install Common Data Service (CDS) Starter Portal.
Hello Folks, I am back again with an another post on power app portal. Today i am going to show to how to install power app portal for Common Data Service (CDS) / Install CDS Starter Portal.
Now follow the below steps to do:
Step 1: Sign in to Power App.
Install PowerApps Portal for Dynamic 365.
Hello Folks, Today i will going to show you, "How to install PowerApps Portal in D365".
Here i am considering, you have the D365 admin credential for which you have to install portal.
Now follow the below steps to do this.
Step 1: Sign in to Power App.
Step 2: After sign-in, you will redirect to the page as show in below screen-shot.
Now in this screen, check the environment for which you are installing the portal. Here I have selected my environment.
Step 3: Now Click on create button on the left panel and then enter portal in the search template field. it will display all the portal templates which are available for the installation.
Step 4: Now click on the portal template which you want to install. it will open a new pop-up window.
Step 5: Enter the details and then click on create button.
Step 6: After click on create button, it will show a notification to you as show in below screen. After complete the installation it will show a another notification. Now you can open your portal with the URL which you provided during installation
But if you do not want to select any template then you can select the option "Portal from blank".
To see the portal after installation, click on the Apps.
Hope this post helps you to understand about power portal !!!
But, before going to install power portal let's discuss about it.
PowerApps Portals were earlier known as Dynamics 365 Portals. This is a major update came from the MS.
D365 Portals, previously offered only as an add-on to model-driven apps in D365, are now available completely standalone inside of Power Apps. Earlier portal was available only for D365 CRM Environment but now it is available for both CDS and D365 CRM Environment.
Based on the selected environment in PowerApps, you can create a Common Data Service starter portal (CDS portal) or a portal in an environment containing model-driven apps in Dynamics 365 (D365 portal). In a simple words we can say, If
But in this article i am going to show you How to install portal for the environment that contains model-driven apps in Dynamics 365 (such as D365 Sales and D365 Customer Service).
Here i am considering, you have the D365 admin credential for which you have to install portal.
Now follow the below steps to do this.
Step 1: Sign in to Power App.
Step 2: After sign-in, you will redirect to the page as show in below screen-shot.
Now in this screen, check the environment for which you are installing the portal. Here I have selected my environment.
Step 3: Now Click on create button on the left panel and then enter portal in the search template field. it will display all the portal templates which are available for the installation.
Step 5: Enter the details and then click on create button.
Step 6: After click on create button, it will show a notification to you as show in below screen. After complete the installation it will show a another notification. Now you can open your portal with the URL which you provided during installation
To see the portal after installation, click on the Apps.
Hope this post helps you to understand about power portal !!!
Create OData API with Entity FrameWork Code first Approach in ASP.NET Core
In this article, I will explain you how to setup OData API in .Net Core but before moving forward if you haven't read my article on Entity Framework Code First Approach in .Net Core then firstly read the article.
OData is an Open Data Protocol which gives the flexibility to your API's through the OData URL Conventions.
In our Part-2, We created the API project and used Entity Framework (Code First Approach). Now we need a mechanism to access the context from our API. Directly accessing the context methods from the API controller is a bad practice and we should avoid that. We will inject interface into our API Controller and API will communicate with the data context using the interface.
Now follow the steps to do this.
Step 1: Install OData Nuget package.
Go to NuGet package manager and install "Microsoft.AspNetCore.OData" package.
Step 2: Create a new folder under the Models folder and name it Repository and Create a new Interface under the repository folder and called it IStudentRepository.
Step 3: Now create a new folder under the Models folder, called it DataManager and then create a new class under this folder named it StudentManager. This class will implement IStudentRepository interface.
GetAll(): Used to gets all the students from DB.
Get(): used to Get a specific student by passing GUID of student
Add(): used to create a new student in DB.
Delete(): used o delete the student from DB.
Update(): used to update student information.
Here we not directly accessing the context file in controller. Now this class(student class) which access the context file will perform all the CRUD operations instead of API controller.
Step 4: Go to Startup.cs file. Here we will configure the repository using dependency injection. This can be done in the ConfigureServices method in the Startup.cs.
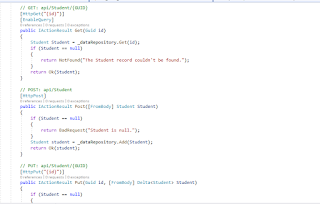
Step 5: Create an API controller for Student.
Go to controller folder and create an API controller in it.
Step 6: Buid the EDM Model.
OData uses the Entity Data Model (EDM) to describe the structure of data. To build the EDM Model, add a static method in startup.cs file.
In this EDM Model, we defined one entity set which is student. you can define more sets according to your requirement.
private static IEdmModel GetEdmModel()
{
ODataConventionModelBuilder builder = new ODataConventionModelBuilder();
builder.EntitySet<Student>("Student");
return builder.GetEdmModel();
}
Step 7: Register the OData Services.
The library provides an extension method called “AddOData()” to register the required OData services through the built-in dependency injection. Now add the following codes into “ConfigureServices” method in the “Startup” class:
and now we also need to change MVC() function service registration.
The EnableEndpointRouting option determines, routing should internally use endpoint-based logic. it's default value is true. Set the value to false. change the code as show in below snapshot.
services.AddMvc(options =>
{
options.EnableEndpointRouting = false;
}).SetCompatibilityVersion(CompatibilityVersion.Version_2_2);
Step 8: Register the OData Endpoint
Now We also need to add OData route to register the OData endpoint. We are going to add an OData route named “odata” with “odata” prefix to the MVC routes, and call the “GetEdmModel()” to bind the Edm model to the endpoint. Now add the following code into Configure method in stratup.cs file
Now let's do the testing.
Now Hit the URL : https://localhost:44376/odata/student
If there is data then all the data will come but if there is no data it will come like this.
Hope this will help you !!!
OData is an Open Data Protocol which gives the flexibility to your API's through the OData URL Conventions.
In our Part-2, We created the API project and used Entity Framework (Code First Approach). Now we need a mechanism to access the context from our API. Directly accessing the context methods from the API controller is a bad practice and we should avoid that. We will inject interface into our API Controller and API will communicate with the data context using the interface.
Now follow the steps to do this.
Step 1: Install OData Nuget package.
Go to NuGet package manager and install "Microsoft.AspNetCore.OData" package.
Step 2: Create a new folder under the Models folder and name it Repository and Create a new Interface under the repository folder and called it IStudentRepository.
using Microsoft.AspNet.OData;
using System;
using System.Linq;
namespace NET_Core_API.Models.Repository
{
public interface IStudentRepository<TEntity> where TEntity : class
{
IQueryable GetAll();
TEntity Get(Guid id);
TEntity Add(TEntity entity);
void Update(TEntity entityToUpdate, Delta<TEntity> entity);
void Delete(TEntity entity);
}
}
using System;
using System.Linq;
namespace NET_Core_API.Models.Repository
{
public interface IStudentRepository<TEntity>
Step 3: Now create a new folder under the Models folder, called it DataManager and then create a new class under this folder named it StudentManager. This class will implement IStudentRepository interface.
using Microsoft.AspNet.OData;
using NET_Core_API.Models.Repository;
using System;
using System.Linq;
namespace NET_Core_API.Models.DataManager
{
public class StudentManager : IStudentRepository<Student>
{
readonly EntityContext _Context;
public StudentManager(EntityContext context)
{
_Context = context;
}
public IQueryable GetAll()
{
return _Context.Students;
}
public Student Get(Guid id)
{
return _Context.Students.FirstOrDefault(e => e.ID == id);
}
public Student Add(Student entity)
{
_Context.Students.Add(entity);
_Context.SaveChanges();
return entity;
}
public void Update(Student studentToUpdate, Delta<Student> newStudent)
{
newStudent.Patch(studentToUpdate);
_Context.SaveChanges();
}
public void Delete(Student student)
{
_Context.Students.Remove(student);
_Context.SaveChanges();
}
}
}
using NET_Core_API.Models.Repository;
using System;
using System.Linq;
namespace NET_Core_API.Models.DataManager
{
public class StudentManager : IStudentRepository<Student>
{
newStudent.Patch(studentToUpdate);
_Context.SaveChanges();
}
GetAll(): Used to gets all the students from DB.
Get(): used to Get a specific student by passing GUID of student
Add(): used to create a new student in DB.
Delete(): used o delete the student from DB.
Update(): used to update student information.
Here we not directly accessing the context file in controller. Now this class(student class) which access the context file will perform all the CRUD operations instead of API controller.
Step 4: Go to Startup.cs file. Here we will configure the repository using dependency injection. This can be done in the ConfigureServices method in the Startup.cs.
services.AddScoped<IStudentRepository<Student>, StudentManager>();
Step 5: Create an API controller for Student.
Go to controller folder and create an API controller in it.
using System;
using System.Linq;
using Microsoft.AspNet.OData;
using Microsoft.AspNetCore.Mvc;
using NET_Core_API.Models;
using NET_Core_API.Models.Repository;
namespace NET_Core_API.Controllers
{
public class StudentController : ODataController
{
private readonly IStudentRepository<Student> _dataRepository;
public StudentController(IStudentRepository<Student> dataRepository)
{
_dataRepository = dataRepository;
}
// GET: api/Student
[HttpGet]
[EnableQuery]
public IActionResult Get()
{
IQueryable Students = _dataRepository.GetAll();
return Ok(Students);
}
// GET: api/Student/{GUID}
[HttpGet("{id}")]
[EnableQuery]
public IActionResult Get(Guid id)
{
Student Student = _dataRepository.Get(id);
if (Student == null)
{
return NotFound("The Student record couldn't be found.");
}
return Ok(Student);
}
// POST: api/Student
[HttpPost]
public IActionResult Post([FromBody] Student Student)
{
if (Student == null)
{
return BadRequest("Student is null.");
}
Student student = _dataRepository.Add(Student);
return Ok(student);
}
// PUT: api/Student/{GUID}
[HttpPut("{id}")]
public IActionResult Put(Guid id, [FromBody] Delta<Student> Student)
{
if (Student == null)
{
return BadRequest("Student is null.");
}
Student StudentToUpdate = _dataRepository.Get(id);
if (StudentToUpdate == null)
{
return NotFound("The Student record couldn't be found.");
}
_dataRepository.Update(StudentToUpdate, Student);
return NoContent();
}
// DELETE: api/Student/{GUID}
[HttpDelete("{id}")]
public IActionResult Delete(Guid id)
{
Student Student = _dataRepository.Get(id);
if (Student == null)
{
return NotFound("The Student record couldn't be found.");
}
_dataRepository.Delete(Student);
return NoContent();
}
}
}
using System.Linq;
using Microsoft.AspNet.OData;
using Microsoft.AspNetCore.Mvc;
using NET_Core_API.Models;
using NET_Core_API.Models.Repository;
namespace NET_Core_API.Controllers
{
public class StudentController : ODataController
{
private readonly IStudentRepository<Student>
{
if (Student == null)
{
return BadRequest("Student is null.");
}
Student StudentToUpdate = _dataRepository.Get(id);
if (StudentToUpdate == null)
{
return NotFound("The Student record couldn't be found.");
}
_dataRepository.Update(StudentToUpdate, Student);
return NoContent();
}
Step 6: Buid the EDM Model.
OData uses the Entity Data Model (EDM) to describe the structure of data. To build the EDM Model, add a static method in startup.cs file.
In this EDM Model, we defined one entity set which is student. you can define more sets according to your requirement.
builder.EntitySet<Student>("Student");
return builder.GetEdmModel();
Step 7: Register the OData Services.
The library provides an extension method called “AddOData()” to register the required OData services through the built-in dependency injection. Now add the following codes into “ConfigureServices” method in the “Startup” class:
services.AddOData();
and now we also need to change MVC() function service registration.
The EnableEndpointRouting option determines, routing should internally use endpoint-based logic. it's default value is true. Set the value to false. change the code as show in below snapshot.
{
options.EnableEndpointRouting = false;
}).SetCompatibilityVersion(CompatibilityVersion.Version_2_2);
Step 8: Register the OData Endpoint
Now We also need to add OData route to register the OData endpoint. We are going to add an OData route named “odata” with “odata” prefix to the MVC routes, and call the “GetEdmModel()” to bind the Edm model to the endpoint. Now add the following code into Configure method in stratup.cs file
app.UseMvc(b =>
{
b.Select().Expand().Filter().OrderBy().MaxTop(1000).Count();
b.MapODataServiceRoute("odata", "odata", GetEdmModel());
b.EnableDependencyInjection();
});
{
b.Select().Expand().Filter().OrderBy().MaxTop(1000).Count();
b.MapODataServiceRoute("odata", "odata", GetEdmModel());
b.EnableDependencyInjection();
});
Now let's do the testing.
Now Hit the URL : https://localhost:44376/odata/student
If there is data then all the data will come but if there is no data it will come like this.
Hope this will help you !!!
What is Data Seeding in .NET Core
Data seeding allows us to provide initial data during the creation of a database. Then, EF Core migrations will automatically determine what insert, update or delete operations need to be applied when upgrading the database to a new version of the model.
So let’s create some seed data now. For this, we need to override the OnModelCreating method in the Context class which we created in EF tutorial.
Copy the below code and paste it in context file. and change the code as per your need
Here we are creating two students in our database.
Now Run the command:
it will update the database with the seed data which we provided
So let’s create some seed data now. For this, we need to override the OnModelCreating method in the Context class which we created in EF tutorial.
Copy the below code and paste it in context file. and change the code as per your need
protected override void OnModelCreating(ModelBuilder modelBuilder)
{
modelBuilder.Entity().HasData(
new Student
{
FirstName = "Student 1",
ID = new System.Guid("9b4cc8d2-78ab-47f0-41bc-08d6d9379d75")
},
new Student
{
FirstName = "Student 2",
ID = new System.Guid("c13d7414-7d42-43c3-b934-08d6d9ed80a3")
}
);
}
{
modelBuilder.Entity
Here we are creating two students in our database.
Now Run the command:
Add-Migration Name
and then update database by running following commands
Update-DataBase
it will update the database with the seed data which we provided
Limitations of seed data
- The primary key value needs to be specified even if it's usually generated by the database. It will be used to detect data changes between migrations.
- Previously seeded data will be removed if the primary key is changed in any way.
Subscribe to:
Posts (Atom)