If you want to Host Portal on IIS then click Here to check how to do it. But if you want to install portal online in Dynamic CRM 365 then follow the below steps.
Here I will show you How to install Customer Portal in Dynamic CRM 365.
Step 1: Open the Dynamic CRM 365 then go to the Admin Center.
Step 2: Now Open Dynamic 365 as show in below image.
Step 3: Click on the solution Icon.
After complete installation, the status will be installed.
Step 5: Go to Application tab. Click on Portal Add-On application and then click on Manage.
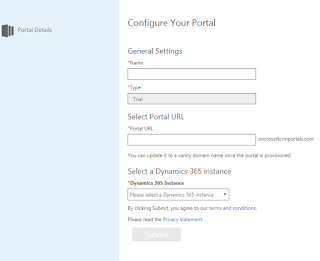
Step 6: It will open a form which is use to configure your portal. After Submit form, your portal will configure in 5-10 min. and Status become Configured.
Now Open the portal.....customer portal look like....
Here I will show you How to install Customer Portal in Dynamic CRM 365.
Step 1: Open the Dynamic CRM 365 then go to the Admin Center.
Step 2: Now Open Dynamic 365 as show in below image.
Step 3: Click on the solution Icon.
Step 4: It will open all the Solutions. If you see there are many portals are available. Click on the Portal's Solution which you want to install. Here i am installing Customer Portal.
After complete installation, the status will be installed.
Step 5: Go to Application tab. Click on Portal Add-On application and then click on Manage.
Step 6: It will open a form which is use to configure your portal. After Submit form, your portal will configure in 5-10 min. and Status become Configured.


2 comments:
Very helpful post, thanks lot! :)
I’m definitely going to add this to my bookmarks. This is a worthy long read. A lot of valid points to come back to.
https://www.crmjetty.com/blog/how-install-the-default-portal-add-on-dynamics-365/
Post a Comment