In this post, I will show you how to use Java-Script in ADX Studio Portal.
Step 1: Login the portal by using
Administrator Role. By default Admin's credential is:
UserId : Administrator
Password : pass@word1
Step 2: Now open the Web-Page on which you want to use JS.
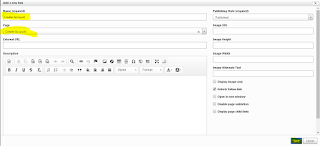
Step 3: Click on
Edit and go to
Option section.
Here you can Write your JS.
Apply the JS OnLoad of WebPage :
$(document).ready(function(){
// Write JS code here
});
There are list of some JS we can use on the Portal.
To Hide Tab :
var tab = $('table[data-name="Section_Name"]').closest('.tab');
var label = tab.prev('.tab-title');
tab.hide();
label.hide(); // Hides the tab's title
OR
$(".tab[data-name='TAB_NAME']").hide();
$(".tab[data-name='TAB_NAME']").prev().hide(); // Hides the tab's title
To Show Tab :
var tab = $('table[data-name="Section_Name"]').closest('.tab');
var label = tab.prev('.tab-title');
tab.show();
label.show(); // Show the tab's title
OR
$(".tab[data-name='TAB_NAME']").show();
$(".tab[data-name='TAB_NAME']").prev().show(); // Hides the tab's title
To Hide Section :
$('table[data-name="Section_Name"]').closest('fieldset').hide();
OR
$(".section[data-name='tab_2_section_1']").closest("fieldset").hide();
To Show Section :
$('table[data-name="tab_2_section_1"]').closest('fieldset').show();
OR
$(".section[data-name='tab_2_section_1']").closest("fieldset").hide();
To Hide Field with Label:
$("#FIELD_NAME").closest("td").hide();
To Show Field with Label:
$("#FIELD_NAME").closest("td").show();
To Hide Field without Label:
$("#FieldName").hide();
To Show Field without Label:
$("#FieldName").show();
Check Visibility of Field:
var hidden = $("#alletec_portalproblemcategory").is(":hidden");
Value would be true or false, if true mean invisible. if false mean visible.
Get value of Text Field :
var fieldValue=$("#FieldName").val();
Get Value of LookUp Field :
var entityName= $("#FieldName_entityname").val();
var lookupGUID = $("#FieldName").val();
var lookupValue = $("#FieldName_name").val();
Get Option Set Value:
var value= $("#FieldName").val();
Set Value of Text Field :
$("#FieldName").val("Value");
Set Value of LookUp :
$("#FieldName_entityname").val(entityName);
$("#FieldName").val(lookupGUID );
$("#FieldName_name").val(lookupValue );
OR
$("#FieldName_name").attr("value",lookupValue );
$("#FieldName").attr("value",lookupGUID );
$("#FieldName_entityname").attr("value",entityName);
Set Option Set Value:
var value= $("#FieldName").val("Value");
Enable Text Field Readonly :
$("#FieldName").attr('readonly', true);
Disable Text field Readonly :
$("#FieldName").attr('readonly', false);
Disable Text field :
$("#FieldName").prop('disabled', true);
Enable Text Field :
$("#FieldName").prop('disabled',false);
Check field is Enable or Disabled:
var disabled = $("#FieldName").is(":disabled");
value either be true or false. If true i.e field is disabled otherwise it is enabled.
Disable LookUp Field :
$("#FieldName_name").parent().find('.input-group-btn').hide();
Enable LookUp Field :
$("#FieldName_name").parent().find('.input-group-btn').show();
To Make Section Read-Only :
$('table[data-name="tab_2_section_1"]').closest('fieldset').find("input,button,textarea,select").attr("readonly", true);
To Make Tab Collapsible :
// Replace TAB_NAME with your tab name.
// Collapsible tabs for TAB_NAME
$('h2:contains("TAB_NAME")').html("<span class='tabMargin'> TAB_NAME </span> <span id='collapseTabNameId' class='glyphicon glyphicon-triangle-top' style='float: right;margin-top: 2px;margin-right: 4px;'></span><span id='expandTabNameId' class='glyphicon glyphicon-triangle-bottom' style='float: right;margin-top: 2px;margin-right: 4px;'></span>");
// Hide Collapse Icon on load
$('#collapseTabNameId').hide();
// Show expand icon, hide collapse icon and show respective tab on click of collapse icon
$("#collapseTabNameId").click(function () {
$('#expandTabNameId').show();
$('#collapseTabNameId').hide();
$("div[data-name='TAB_NAME']").fadeIn(1000);
});
// Show collapse icon, hide expand icon and show respective tab on click of expand icon
$("#expandTabNameId").click(function () {
$('#collapseTabNameId').show();
$('#expandTabNameId').hide();
$("div[data-name='TAB_NAME']").fadeOut();
});
// Also add below CSS to look good, you can also change this based on your requirement.
.tab-title{
background-color: #e0dada;
font-size: 22px;
padding: 10px;
font-weight: bold;
}
.section-title{
font-size: 15px;
background-color: #f9f9f9;
padding: 6px;
}
Get LoggedIn User Information:
var userId = '{{user.contactid}}';
var userName = '{{user.fullname}}';
Get LoggedIn User Roles:
var roles = "{{user.roles}}";
console.log(roles);
var role = roles.contains("ROLE_NAME");
Get Count or No of records from a Sub-Grid on a Entity/Basic Form:
var rows = $("#ID_OF_GRID").find("tbody tr").length;
Get Count or No of records from a Entity List on a Web Page:
Register the function on load of List and use the below code to get the no of records. Replace the ENTITY_NAME with name of table.
var rows = $(this).children(".view-grid").find("tr[data-entity='ENTITY_NAME']");
Get Query Parameter Data from URL:
var queryString = window.location.search;
if (queryString) {
var params = new URLSearchParams(queryString);
var nfa = params.get('Id');
}
Refresh the Entity List :
$(".entitylist.entity-grid").trigger("refresh");
*************************************************************
Now I am showing How to set Contact Look Up based on User Login.
Copy Paste the following code in your portal webpage...
$(document).ready(function(){
// get user login info.
var userName = '{{user.fullname}}';
var userId = '{{user.contactid}}';
// set user info.
$("#FieldName").val(userId);
$("#FieldName_name").val(userName);
$("#FieldName_entityname").val("contact");
// Make the Look-Up Read Only
$("#FieldName_name").parent().find('.input-group-btn').hide();
});
Click
Here to know,
Apply Client Side validation in D365 Portal / ADX Studio Portal.
Click
Here to know
, Retrieve the data using Odata Query in D365 Portal / ADX Studio Portal.
Click
Here to know,
How to Disable open registration process in D365 Portal.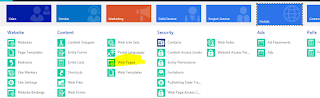




 .
.


